Spring Cloud Netflix
简介
Spring Cloud 是一个基于Spring Boot 实现的云应用开发工具,它为基于JVM的云应用开发中涉及的配置管理、服务发现、断路器、智能路由、微代理、控制总线、全局锁、决策竞选、分布式会话和集群状态管理等操作提供了一种简单的开发方式。
Spring Cloud包含了多个子项目(针对分布式系统中涉及的多个不同开源产品),比如:Spring Cloud Config、Spring Cloud Netflix、Spring Cloud0 CloudFoundry、Spring Cloud AWS、Spring Cloud Security、Spring Cloud Commons、Spring Cloud Zookeeper、Spring Cloud CLI等项目。
Spring Cloud有多种不同的实现方式,其中最常用的是 Spring Cloud Netflix 和 Spring Cloud Alibaba。
Spring Cloud Netflix
Spring Cloud Netflix 常用组件包括:
- 服务注册和发现:
Netflix Eureka - 客服端负载均衡:
Netflix Ribbon - 断路器:
Netflix Hystrix - 服务网关:
Netflix Zuul - 分布式配置:
Spring Cloud Config
服务注册与发现Eureka
Eureka 是一个高可用的组件,它没有后端缓存,每一个实例注册之后需要向注册中心发送心跳(因此可以在内存中完成),在默认情况下Erureka Server也是一个Eureka Client,必须要指定一个Server。
创建一个Spring Boot工程,名字就叫 eureka-server,可以直接使用Spring Initializr创建,选择Cloud Discovery和Eureka Server,也可以使用以下pom:
<?xml version="1.0" encoding="UTF-8"?>
<project xmlns="http://maven.apache.org/POM/4.0.0" xmlns:xsi="http://www.w3.org/2001/XMLSchema-instance"
	xsi:schemaLocation="http://maven.apache.org/POM/4.0.0 https://maven.apache.org/xsd/maven-4.0.0.xsd">
	<modelVersion>4.0.0</modelVersion>
	<parent>
		<groupId>org.springframework.boot</groupId>
		<artifactId>spring-boot-starter-parent</artifactId>
		<version>2.0.1.RELEASE</version>
		<relativePath/> <!-- lookup parent from repository -->
	</parent>

	<groupId>com.xm</groupId>
	<artifactId>spring-cloud-eureka-server</artifactId>
	<version>0.0.1-SNAPSHOT</version>
	<name>spring-cloud-eureka-server</name>
	<description>Demo project for Spring Boot</description>
	<packaging>jar</packaging>

	<properties>
		<java.version>11</java.version>
		<spring-cloud.version>Finchley.SR4</spring-cloud.version>
	</properties>

	<dependencies>
		<dependency>
			<groupId>org.springframework.cloud</groupId>
			<artifactId>spring-cloud-starter-netflix-eureka-server</artifactId>
		</dependency>

		<dependency>
			<groupId>org.springframework.boot</groupId>
			<artifactId>spring-boot-starter-test</artifactId>
			<scope>test</scope>
		</dependency>

		<dependency>
			<groupId>javax.xml.bind</groupId>
			<artifactId>jaxb-api</artifactId>
			<version>2.3.1</version>
		</dependency>

		<dependency>
			<groupId>com.sun.xml.bind</groupId>
			<artifactId>jaxb-impl</artifactId>
			<version>2.3.1</version>
		</dependency>

		<dependency>
			<groupId>org.glassfish.jaxb</groupId>
			<artifactId>jaxb-runtime</artifactId>
			<version>2.3.1</version>
		</dependency>

		<dependency>
			<groupId>javax.activation</groupId>
			<artifactId>activation</artifactId>
			<version>1.1.1</version>
		</dependency>

	</dependencies>

	<dependencyManagement>
		<dependencies>
			<dependency>
				<groupId>org.springframework.cloud</groupId>
				<artifactId>spring-cloud-dependencies</artifactId>
				<version>${spring-cloud.version}</version>
				<type>pom</type>
				<scope>import</scope>
			</dependency>
		</dependencies>
	</dependencyManagement>

	<build>
		<plugins>
			<plugin>
				<groupId>org.springframework.boot</groupId>
				<artifactId>spring-boot-maven-plugin</artifactId>
			</plugin>
		</plugins>
	</build>

</project>
Spring Cloud和Spring Boot之间有版本关联关系,这里使用的是F版,需要搭配Spring Boot 2.0.x版本,同时,由于使用了jdk11,相比jdk8取消了jaxb模块,需要导入相关
jaxb依赖,否则无法启动。
配置单点服务注册中心
创建application.yml配置文件如下:
spring:
	application:
		name: eureka-server
server:
	port: 7000
eureka:
	instance:
		hostname: localhost
	client:
		register-with-eureka: false
		fetch-registry: false
		service-url:
			defaultZone: http://${eureka.instance.hostname}:${server.port}/eureka/
参数说明:
server.port:服务注册中心的端口eureka.client.register-with-eureka:表示是否将自己注册到Eureka Server,默认为true。eureka.client.fetch-registry:表示是否从Eureka Server获取注册信息,默认为true。eureka.client.service-url.defaultZone:设置与Eureka Server交互的地址,查询服务和注册服务都需要依赖这个地址。默认是http://localhost:8761/eureka;多个地址可使用英文逗号(,)分隔。
在默认设置下,该服务注册中心也会将自己作为客户端来尝试注册它自己,所以我们需要禁用它的客户端注册行为。
之后通过@EnableEurekaServer和@SpringBootApplication启动应用:
@SpringBootApplication
@EnableEurekaServer
public class SpringCloudEurekaServerApplication {

		public static void main(String[] args) {
				SpringApplication.run(SpringCloudEurekaServerApplication.class, args);
		}
}
启动工程后,访问http://localhost:7000/就可以浏览到。
配置集群
注册中心这么关键的服务,如果是单点的话,遇到故障就是毁灭性的。在一个分布式系统中,服务注册中心是最重要的基础部分,理应随时处于可以提供服务的状态。为了维持其可用性,使用集群是很好的解决方案。Eureka通过互相注册的方式来实现高可用的部署,所以只需要将Eureke Server配置其他可用的service-url就能实现高可用部署。
双节点配置
- 创建三份配置文件如下:
application.properties:
spring.application.name=eureka-server
application-peer1.properties:
spring.application.name=eureka-server
server.port=1111

eureka.instance.hostname=peer1.cn
eureka.client.serviceUrl.defaultZone=http://peer2.cn:1112/eureka/
application-peer2.properties:
spring.application.name=eureka-server
server.port=1112

eureka.instance.hostname=peer2.cn
eureka.client.serviceUrl.defaultZone=http://peer1.cn:1111/eureka/
- 修改
hosts配置文件
127.0.0.1 peer1.cn
127.0.0.1 peer2.cn
- 启动项目:可以通过idea配置两个启动项启动,也可以打包后启动,命令如下:
# 打包
mvn clean package  -Dmaven.test.skip=true

# 分别以peer1和peer2配置信息启动Eureka
java -jar target/spring-cloud-eureka-server-0.0.1-SNAPSHOT.jar  --spring.profiles.active=peer1
java -jar target/spring-cloud-eureka-server-0.0.1-SNAPSHOT.jar  --spring.profiles.active=peer2
启动后显示如下: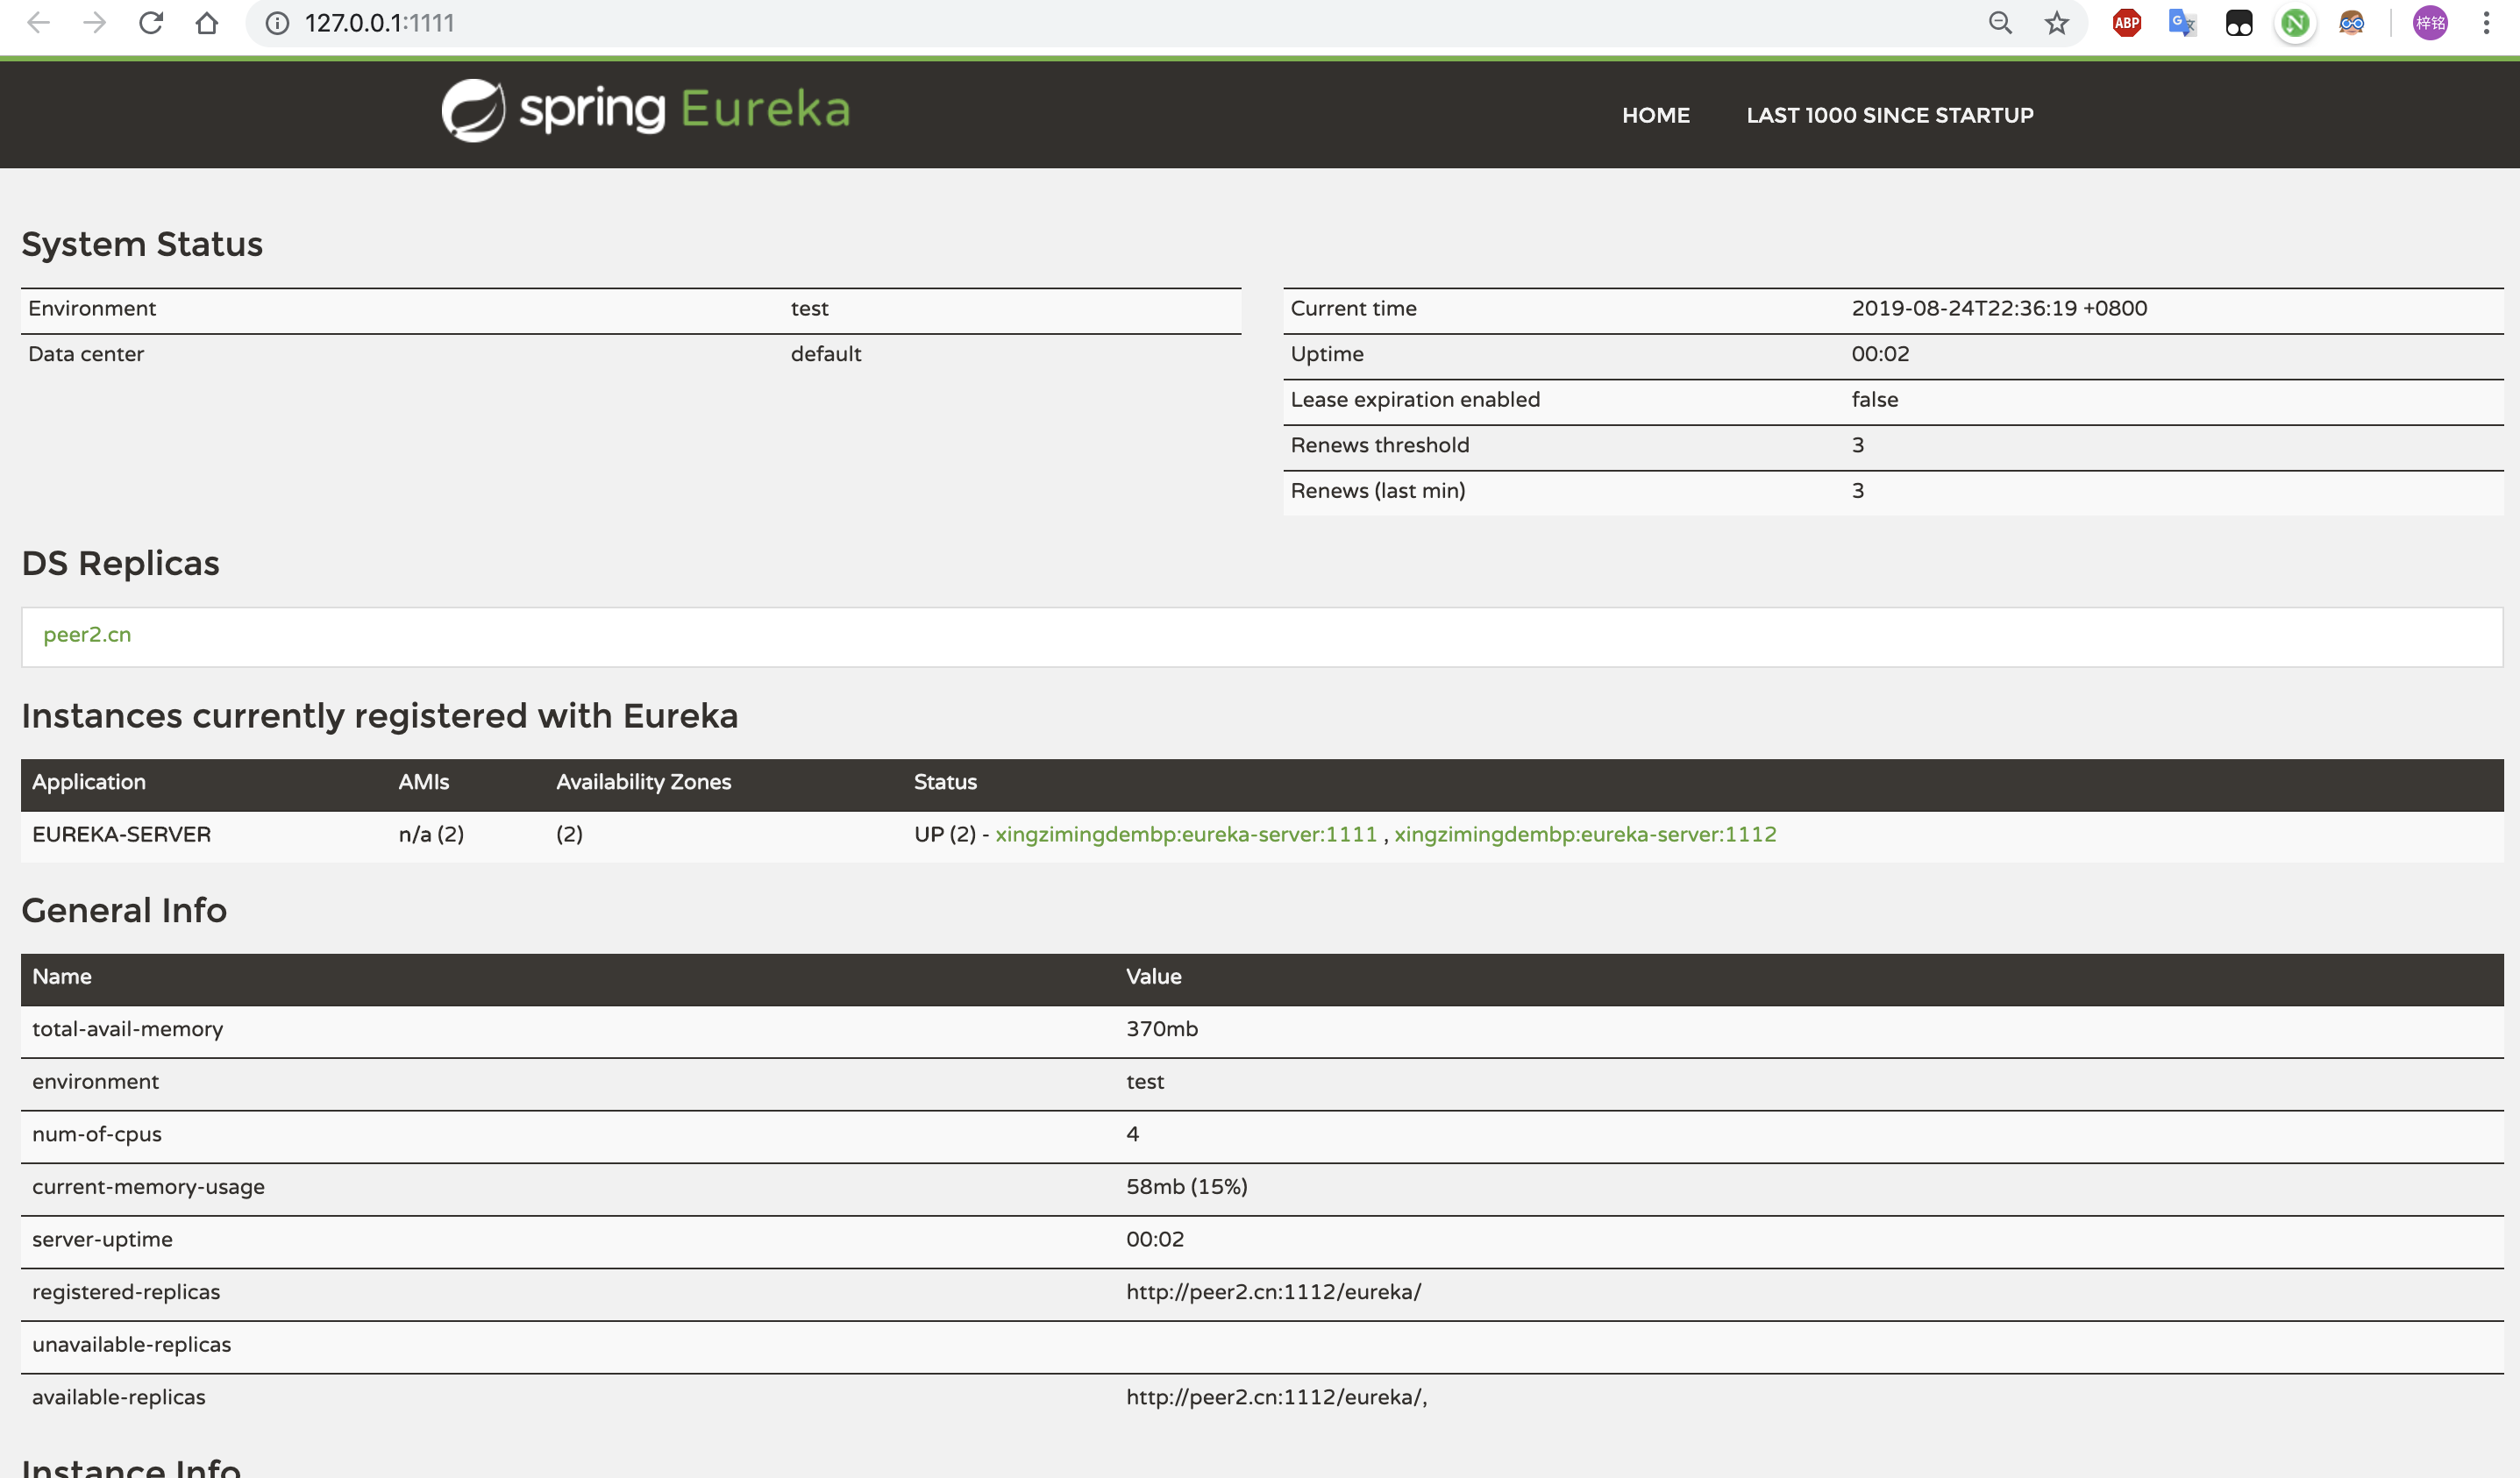
根据图可以看出peer1的注册中心DS Replicas已经有了peer2的相关配置信息,并且出现在 available-replicas中。手动停止peer2来观察,发现peer2就会移动到unavailable-replicas一栏中,表示peer2不可用。
注意事项:
- 在搭建Eureka Server双节点或集群的时候,要把
eureka.client.register-with-eureka和eureka.client.fetch-registry均改为true(默认)。否则会出现实例列表为空,且peer2不在available-replicas而在unavailable-replicas的情况(这时其实只是启动了两个单点实例)。 - 在注册的时候,配置文件中的
spring.application.name必须一致,否则情况会出现各自出现在unavaliable-replicas中
多节点配置
多创建一个配置文件,修改增加serviceUrl即可:
spring.application.name=eureka-server
server.port=1113

eureka.instance.hostname=peer3.cn
eureka.client.serviceUrl.defaultZone=http://peer1.cn:1111/eureka/,http://peer2.cn:1112/eureka/
服务提供者Eureka
创建一个spring-cloud-eureka-producer的Sring Cloud项目,步骤如下:
- 首先引入pom包
<dependencies>
	<dependency>
			<groupId>org.springframework.boot</groupId>
			<artifactId>spring-boot-starter-web</artifactId>
	</dependency>
	<dependency>
			<groupId>org.springframework.cloud</groupId>
			<artifactId>spring-cloud-starter-netflix-eureka-client</artifactId>
	</dependency>
</dependencies>
- 创建配置文件
spring:
	application:
		name: eureka-producer
eureka:
	client:
		service-url:
			defaultZone: http://localhost:7000/eureka/
server:
	port: 8000
通过spring.application.name属性,可以指定微服务的名称,后续在调用的时候只需要使用该名称就可以进行服务的访问。eureka.client.serviceUrl.defaultZone属性对应服务注册中心的配置内容,指定服务注册中心的位置。为了在本机上测试区分服务提供方和服务注册中心,使用server.port属性设置不同的端口。
3. 创建相应的controller
@RestController
@RequestMapping("/hello")
public class HelloController {

		@GetMapping("/")
		public String hello(@RequestParam String name){
				return "Hello,"+ name + "" + new Date();
		}
}
- 配置启动类
//注意此处如果不是在同一包下,要加入扫描的包
@SpringBootApplication(scanBasePackages = {"com.xm"})
public class EurekaProducerApplication {
		public static void main(String[] args) {
				SpringApplication.run(EurekaProducerApplication.class,args);
		}
}
如果引入了相关的jar包又想禁用服务注册与发现,可以设置eureka.client.enabled=false
5. 启动工程后,就可以在注册中心Eureka的页面看到EUERKA-PRODUCER服务,接着可以访问http://localhost:8000/hello/?name=xm进行测试。
服务消费者
创建服务消费者根据使用API的不同,大致分为三种方式:LoadBalancerClient,Ribbon和Feign。
使用LoadBalancerClient
LoadBalancerClient是一个负载均衡客户端的抽象定义,具体使用步骤如下:
- pom文件跟producer一样
- 配置文件:
spring:
	application:
		name: eureka-consumer
eureka:
	client:
		service-url:
			defaultZone: http://localhost:7000/eureka/ # 指定 Eureka 注册中心的地址
server:
	port: 9000
- 控制器
@RequestMapping("/hello")
@RestController
public class HelloController {

		@Autowired
		private LoadBalancerClient client;

		@Autowired
		private RestTemplate restTemplate;

		@GetMapping("/")
		public String hello(@RequestParam String name){
				name += "!";
				ServiceInstance instance = client.choose("eureka-producer");
				String url = "http://"+instance.getHost()+":"+instance.getPort()+"/hello/?name="+name;
				return restTemplate.getForObject(url,String.class);
		}
}
这里注入了LoadBalancerClient和RestTemplate,并在hello方法中,先通过loadBalancerClient的choose方法来负载均衡的选出一个eureka-producer的服务实例,这个服务实例的基本信息存储在ServiceInstance中,然后通过这些对象中的信息拼接出访问服务调用者的/hello/接口的详细地址,最后再利用RestTemplate对象实现对服务提供者接口的调用。
RestTemplate需要在配置类中进行依赖注入
- 启动类
@SpringBootApplication(scanBasePackages = {"com.xm"})
public class EurekaConsumerApplication {

		//该类需要进行依赖注入
		@Bean
		public RestTemplate restTemplate(){
				return new RestTemplate();
		}

		public static void main(String[] args) {
				SpringApplication.run(EurekaConsumerApplication.class,args);
		}
}
之后便可以通过http://localhost:9000/hello/?name=xm访问到
使用Ribbon
Ribbon是一个基于HTTP和TCP的客户端负载均衡器。它可以通过在客户端中配置ribbonServerList来设置服务端列表去轮询访问以达到均衡负载的作用。
当Ribbon与Eureka联合使用时,ribbonServerList会被DiscoveryEnabledNIWSServerList重写,扩展成从Eureka注册中心中获取服务实例列表。同时它也会用NIWSDiscoveryPing来取代IPing,它将职责委托给Eureka来确定服务端是否已经启动。
步骤如下:
- pom配置如LoadBalancerClient
- 配置文件如上,只需要修改一下port
- 创建控制器
@RequestMapping("/hello")
@RestController
public class HelloController {

		@Autowired
		private RestTemplate restTemplate;

		@GetMapping("/")
		public String hello(@RequestParam String name){
				name += "!";
				String url = "http://eureka-producer/hello/?name="+name;
				return restTemplate.getForObject(url,String.class);
		}
}
这里直接用服务名eureka-producer取代了之前的具体的host:port。因为Spring Cloud Ribbon有一个拦截器,它能够在这里进行实际调用的时候,自动的去选取服务实例,并将这里的服务名替换成实际要请求的 IP 地址和端口,从而完成服务接口的调用。
4. 启动类
@SpringBootApplication(scanBasePackages = {"com.xm"})
public class EurekaConsumerApplication {

		@LoadBalanced //增加负载均衡注解
		@Bean
		public RestTemplate restTemplate(){
				return new RestTemplate();
		}

		public static void main(String[] args) {
				SpringApplication.run(EurekaConsumerApplication.class,args);
		}
}
启动后访问http://localhost:9001/hello/?name=xm验证
使用Feign
- 引入的pom:
<dependencies>
		<dependency>
				<groupId>org.springframework.boot</groupId>
				<artifactId>spring-boot-starter-web</artifactId>
		</dependency>
		<dependency>
				<groupId>org.springframework.cloud</groupId>
				<artifactId>spring-cloud-starter-openfeign</artifactId>
		</dependency>
		<dependency>
				<groupId>org.springframework.cloud</groupId>
				<artifactId>spring-cloud-starter-netflix-eureka-client</artifactId>
		</dependency>
</dependencies>
- 全局配置文件:同样只需要修改以下port
- Feign调用:创建一个Feign的客户端接口定义。使用
@FeignClient注解来指定这个接口所要调用的服务名称,接口中定义的各个函数使用Spring MVC的注解就可以来绑定服务提供方的REST接口,比如下面就是绑定eureka-producer服务的/hello/接口的例子:
@FeignClient(name="eureka-producer")
public interface HelloRemote {

		@GetMapping("/hello/")
		public String hello(@RequestParam(value = "name") String name);
}
此类中的方法和远程服务中Contoller中的方法名和参数需保持一致。
4. 控制器:
@RestController
@RequestMapping("/hello")
public class HelloController {

		@Autowired
		private HelloRemote helloRemote;

		@GetMapping("/")
		public String index(@RequestParam String name){
				return helloRemote.hello(name+"!");
		}
}
注意接口和控制器的以及服务提供者的路径和参数都必须一致
- 启动类:使用
EnableFeignClients注解,同时需要指定基础包,不然会使helloRemote无法被自动注入
@EnableFeignClients(basePackages = {"com.xm"})
@SpringBootApplication(scanBasePackages = {"com.xm"})
public class EurekaConsumerFeignApplication {

		public static void main(String[] args) {
				SpringApplication.run(EurekaConsumerFeignApplication.class,args);
		}
}
通过Spring Cloud Feign来实现服务调用的方式非常简单,通过@FeignClient定义的接口来统一的声明我们需要依赖的微服务接口。而在具体使用的时候就跟调用本地方法一样的进行调用即可。
负载均衡:只需要启动两个相同的服务提供者,映射到不同端口,消费者在消费时就会轮询两个提供者。
服务容错保护Hystrix
服务雪崩效应
服务雪崩效应是一种因服务提供者的不可用导致服务调用者的不可用,并将不可用逐渐放大的过程。形成的原因主要有以下三个阶段形成:
- 服务提供者不可用
- 重试加大流量
- 服务调用者不可用
其中,造成服务提供者不可用的原因有: - 硬件故障
- 程序 Bug
- 缓存击穿
- 用户大量请求
造成重试加大流量的原因有: - 用户重试
- 代码逻辑重试
服务调用者不可用产生的主要原因是:
- 同步等待造成的资源耗尽
应对策略
针对不同的原因,可以采用不同的应对策略:
- 流量控制
- 改进缓存模式
- 服务自动扩容
- 服务调用者降级服务
流量控制的具体措施包括:
- 网关限流
- 用户交互限流
- 关闭重试
改进缓存模式包括: - 缓存预加载
- 同步改为异步刷新
服务自动扩容 的措施主要有: - AWS 的 auto scaling
服务调用者降级服务 的措施包括: - 资源隔离
- 对依赖服务进行分类
- 不可用服务的调用快速失败
使用Hystrix预防服务雪崩
服务降级(Fallback)
对于查询操作,可以实现一个fallback方法,当请求后端服务出现异常的时候,可以使用fallback1方法返回的值。fallback方法的返回值一般是设置的默认值或者来自缓存。
资源隔离
在Hystrix中,主要通过线程池来实现资源隔离。通常在使用的时候我们会根据调用的远程服务划分出多个线程池。例如调用产品服务的Command放入A线程池,调用账户服务的Command放入B线程池。这样做的主要优点是运行环境被隔离开了。这样就算调用服务的代码存在bug或者由于其他原因导致自己所在线程池被耗尽时,不会对系统的其他服务造成影响。
Hystrix中除了使用线程池之外,还可以使用信号量来控制单个依赖服务的并发度,信号量的开销要远比线程池的开销小得多,但是它不能设置超时和实现异步访问。所以,只有在依赖服务是足够可靠的情况下才使用信号量。在HystrixCommand和HystrixObservableCommand中2处支持信号量的使用:
- 命令执行:如果隔离策略参数
execution.isolation.strategy设置为SEMAPHORE,Hystrix会使用信号量替代线程池来控制依赖服务的并发控制。 - 降级逻辑:当Hystrix尝试降级逻辑时候,它会在调用线程中使用信号量。
信号量的默认值为10,我们也可以通过动态刷新配置的方式来控制并发线程的数量。对于信号量大小的估算方法与线程池并发度的估算类似。仅访问内存数据的请求一般耗时在1ms以内,性能可以达到5000rps,这样级别的请求我们可以将信号量设置为1或者2,我们可以按此标准并根据实际请求耗时来设置信号量。
熔断器模式
在分布式架构中,断路器模式的作用是当某个服务单元发生故障(类似用电器发生短路)之后,通过断路器的故障监控(类似熔断保险丝),直接切断原来的主逻辑调用。但是,在Hystrix中的断路器除了切断主逻辑的功能之外,还有更复杂的逻辑:
当Hystrix Command请求后端服务失败数量超过一定阈值,断路器会切换到开路状态 (Open)。这时所有请求会直接失败而不会发送到后端服务。
这个阈值涉及到三个重要参数:快照时间窗、请求总数下限、错误百分比下限。这个参数的作用分别是:
- 快照时间窗:断路器确定是否打开需要统计一些请求和错误数据,而统计的时间范围就是快照时间窗,默认为最近的 10 秒。
- 请求总数下限:在快照时间窗内,必须满足请求总数下限才有资格进行熔断。默认为 20,意味着在 10 秒内,如果该Hystrix Command的调用此时不足 20 次,即时所有的请求都超时或其他原因失败,断路器都不会打开。
- 错误百分比下限:当请求总数在快照时间窗内超过了下限,比如发生了 30 次调用,如果在这 30 次调用中,有 16 次发生了超时异常,也就是超过 50% 的错误百分比,在默认设定 50% 下限情况下,这时候就会将断路器打开。
断路器保持在开路状态一段时间后 (默认 5 秒),自动切换到半开路状态 (HALF-OPEN)。这时会判断下一次请求的返回情况,如果请求成功,断路器切回闭路状态 (CLOSED),否则重新切换到开路状态 (OPEN)。
使用Feign Hystrix
熔断只作用在服务调用的一端,所以只需在之前的代码中修改eureka-cousumer-feign相关代码。
- 修改配置文件
spring:
	application:
		name: eureka-consumer
eureka:
	client:
		service-url:
			defaultZone: http://localhost:7000/eureka/ # 指定 Eureka 注册中心的地址
server:
	port: 9002
feign:
	hystrix:
		enabled: true
- 创建回调类
HelloRemoteHystrix实现HelloRemote中的方法,作为熔断后的响应:
@Component
public class HelloRemoteHystrix implements HelloRemote {
		@Override
		public String hello(@RequestParam(value = "name") String name) {
				return "Hello World!";
		}
}
- 在
HelloRemote类的FeignClient注解中添加fallback类,在服务熔断的时候返回fallback类中的内容:
@FeignClient(name="eureka-producer",fallback = HelloRemoteHystrix.class)
public interface HelloRemote {

		@GetMapping("/hello/")
		String hello(@RequestParam(value = "name") String name);
}
之后只需要关闭producer进行测试就可以发现已经熔断。
Hystrix监控面板
断路器是根据一段时间窗内的请求情况来判断并操作断路器的打开和关闭状态的。而这些请求情况的指标信息都是HystrixCommand和HystrixObservableCommand实例在执行过程中记录的重要度量信息,它们除了Hystrix断路器实现中使用之外,对于系统运维也有非常大的帮助。这些指标信息会以 “滚动时间窗” 与 “桶”结合的方式进行汇总,并在内存中驻留一段时间,以供内部或外部进行查询使用,Hystrix Dashboard就是这些指标内容的消费者之一。
创建Hystrix Dashboard
首先创建一个Spring Boot工程,命名为hystrix-dashboard
- pom配置如下:
<dependency>
		<groupId>org.springframework.cloud</groupId>
		<artifactId>spring-cloud-starter-netflix-hystrix</artifactId>
</dependency>
<dependency>
		<groupId>org.springframework.cloud</groupId>
		<artifactId>spring-cloud-starter-netflix-hystrix-dashboard</artifactId>
</dependency>
- 启动类:
@EnableHystrixDashboard
@SpringBootApplication
public class HystrixDashboardApplication {
		public static void main(String[] args) {
				SpringApplication.run(HystrixDashboardApplication.class,args);
		}
}
- 配置文件
spring:
	application:
		name: hystrix-dashboard
server:
	port: 11000
之后访问http://localhost:11000/hystrix,看到如下界面:

通过Hystrix Dashboard主页面的文字介绍,可以知道,Hystrix Dashboard 共支持三种不同的监控方式:
- 默认的集群监控:通过 URL:http://turbine-hostname:port/turbine.stream 开启,实现对默认集群的监控。
- 指定的集群监控:通过 URL:http://turbine-hostname:port/turbine.stream?cluster=[clusterName] 开启,实现对 clusterName 集群的监控。
- 单体应用的监控: 通过 URL:http://hystrix-app:port/actuator/hystrix.stream 开启,实现对具体某个服务实例的监控
前两者都对集群的监控,需要整合Turbine才能实现。
页面上的另外两个参数: - Delay:控制服务器上轮询监控信息的延迟时间,默认为 2000 毫秒,可以通过配置该属性来降低客户端的网络和 CPU 消耗。
- Title:该参数可以展示合适的标题。
为服务实例添加endpoint
针对服务消费者进行修改:
- 在服务实例pom.xml中的dependencies节点中新增
spring-boot-starter-actuator监控模块以开启监控相关的端点,并确保已经引入断路器的依赖spring-cloud-starter-netflix-hystrix
<dependency>
		<groupId>org.springframework.boot</groupId>
		<artifactId>spring-boot-starter-web</artifactId>
</dependency>
<dependency>
		<groupId>org.springframework.cloud</groupId>
		<artifactId>spring-cloud-starter-openfeign</artifactId>
</dependency>
<dependency>
		<groupId>org.springframework.cloud</groupId>
		<artifactId>spring-cloud-starter-netflix-eureka-client</artifactId>
</dependency>
<dependency>
		<groupId>org.springframework.boot</groupId>
		<artifactId>spring-boot-starter-actuator</artifactId>
</dependency>
<dependency>
		<groupId>org.springframework.cloud</groupId>
		<artifactId>spring-cloud-starter-netflix-hystrix</artifactId>
</dependency>
- 为启动类添加
@EnableCircuitBreaker或@EnableHystrix注解,开启断路器功能。
@EnableHystrix
@EnableFeignClients(basePackages = {"com.xm"})
@SpringBootApplication(scanBasePackages = {"com.xm"})
public class EurekaConsumerFeignApplication {

		public static void main(String[] args) {
				SpringApplication.run(EurekaConsumerFeignApplication.class,args);
		}
}
- 配置文件application.yml中添加如下内容:
management:
	endpoints:
		web:
			exposure:
				include: hystrix.stream
management.endpoints.web.exposure.include这个是用来暴露 endpoints 的。由于 endpoints 中会包含很多敏感信息,除了 health 和 info 两个支持 web 访问外,其他的默认不支持 web 访问。
- 测试
在 Hystrix-Dashboard 的主界面上输入eureka-consumer-feign-hystrix对应的地址http://localhost:9004/actuator/hystrix.stream然后点击 Monitor Stream 按钮,进入页面。
如果没有请求会一直显示 “Loading…” ,这时访问http://localhost:9004/actuator/hystrix.stream也是不断的显示”ping”。
这时候访问一下http://localhost:9002/hello/?name=xm,可以看到 Hystrix Dashboard 中出现了类似下面的效果:

界面解读
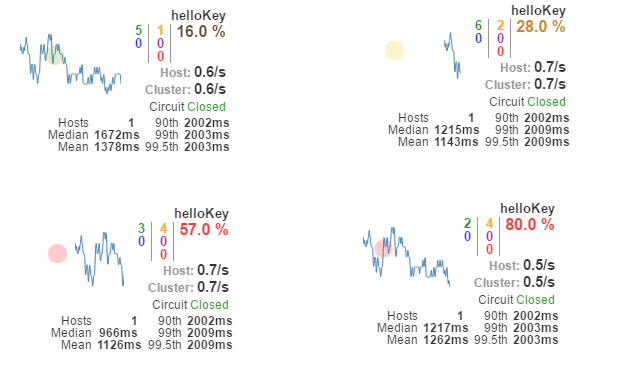
以上图来说明其中各元素的具体含义:
- 实心圆:它有颜色和大小之分,分别代表实例的监控程度和流量大小。如上图所示,它的健康度从绿色、黄色、橙色、红色递减。通过该实心圆的展示,我们就可以在大量的实例中快速的发现故障实例和高压力实例。
- 曲线:用来记录 2 分钟内流量的相对变化,我们可以通过它来观察到流量的上升和下降趋势。
其他一些数量指标如下图所示: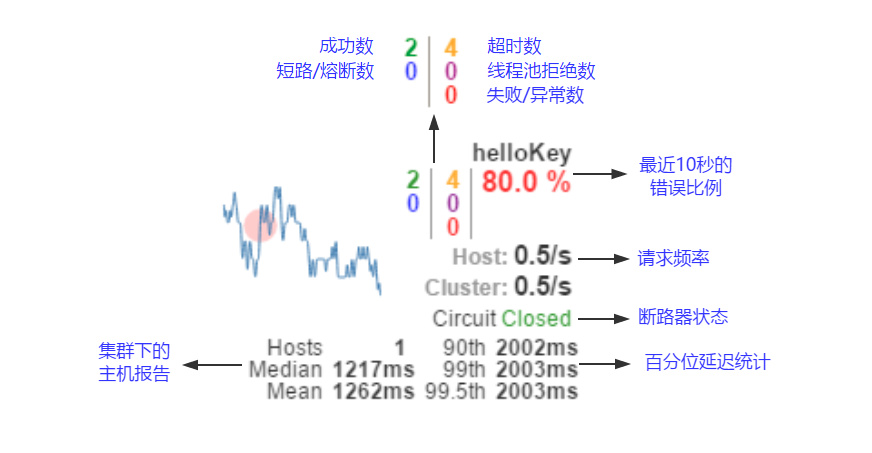
Spring Cloud Config 服务配置中心
Spring Cloud Config 是 Spring Cloud 团队创建的一个全新项目,用来为分布式系统中的基础设施和微服务应用提供集中化的外部配置支持,它分为服务端与客户端两个部分。其中服务端也称为分布式配置中心,它是一个独立的微服务应用,用来连接配置仓库并为客户端提供获取配置信息、加密/解密信息等访问接口;而客户端则是微服务架构中的各个微服务应用或基础设施,它们通过指定的配置中心来管理应用资源与业务相关的配置内容,并在启动的时候从配置中心获取和加载配置信息。Spring Cloud Config 实现了对服务端和客户端中环境变量和属性配置的抽象映射,所以它除了适用于 Spring 构建的应用程序之外,也可以在任何其他语言运行的应用程序中使用。由于 Spring Cloud Config 实现的配置中心默认采用 Git 来存储配置信息,所以使用 Spring Cloud Config 构建的配置服务器,天然就支持对微服务应用配置信息的版本管理,并且可以通过 Git 客户端工具来方便的管理和访问配置内容。当然它也提供了对其他存储方式的支持,比如:SVN 仓库、本地化文件系统。
创建Git仓库
准备一个 Git 仓库,在 Github 上面创建了一个文件夹config-repo用来存放配置文件,为了模拟生产环境,我们创建以下三个配置文件:
// 开发环境
config-client-dev.yml
// 测试环境
config-client-test.yml
// 生产环境
config-client-prod.yml
每个配置文件的内容都是一个属性info.profile,属性值分别为dev/test/prod
Server端
创建一个基础的Spring Boot工程,命名为:config-server-git,使用步骤如下:
- 在pom.xml中加入spring-cloud-config-server依赖:
<dependency>
		<groupId>org.springframework.cloud</groupId>
		<artifactId>spring-cloud-config-server</artifactId>
</dependency>
- 在application.yml中添加配置服务的基本信息以及Git仓库的相关信息
spring:
	application:
		name: config-server
	cloud:
		config:
			server:
				git:
					uri: https://github.com/xiao-ming9/spring-cloud-study # 配置git仓库的地址
					search-paths: config-repo # git仓库地址下的相对地址,可以配置多个,用,分割
server:
	port: 12000
相关配置说明:
- spring.cloud.config.label:配置仓库的分支
- spring.cloud.config.server.git.uri:配置 Git 仓库地址(GitHub、GitLab、码云 …)
- spring.cloud.config.server.git.search-paths:配置仓库路径(存放配置文件的目录)
如果使用 GitLab 作为仓库的话,git.uri 需要在结尾加上 .git,GitHub 则不用
Spring Cloud Config也提供本地存储配置的方式。我们只需要设置属性spring.profiles.active=native,Config Server会默认从应用的src/main/resource目录下检索配置文件。也可以通过spring.cloud.config.server.native.searchLocations=file:E:/properties/属性来指定配置文件的位置。
如果我们的 Git 仓库需要权限访问,那么可以通过配置下面的两个属性来实现:
- spring.cloud.config.server.git.username:访问 Git 仓库的用户名
- spring.cloud.config.server.git.password:访问 Git 仓库的用户密码
- 启动类添加 @EnableConfigServer,激活对配置中心的支持
@SpringBootApplication
@EnableConfigServer
public class ConfigServerApplication {
		public static void main(String[] args) {
				SpringApplication.run(ConfigServerApplication.class,args);
		}
}
- 测试
首先要测试Server端是否可以读取到github上面的配置信息,直接访问http://localhost:12000/config-client/dev可以获取到信息。
如果直接查看配置文件中的配置信息可访问http://localhost:12000/config-client-dev.yml返回
在GitHub上提交新内容后,Server端会自动读取最新提交的内容。
仓库中的配置文件会被转换成 Web 接口,访问可以参照以下的规则:
/{application}/{profile}[/{label}]/{application}-{profile}.yml/{label}/{application}-{profile}.yml/{application}-{profile}.properties/{label}/{application}-{profile}.properties
上面的 URL 会映射{application}-{profile}.yml对应的配置文件,其中{label}对应Git上不同的分支,默认为master。以config-client-dev.yml为例子,它的 application 是config-client,profile是dev。
Client端
再创建一个基础的 Spring Boot 应用,命名为 config-client。使用步骤如下:
- 在pom.xml中添加下述依赖:
 <dependency>
		<groupId>org.springframework.boot</groupId>
		<artifactId>spring-boot-starter-web</artifactId>
</dependency>
<dependency>
		<groupId>org.springframework.cloud</groupId>
		<artifactId>spring-cloud-starter-config</artifactId>
</dependency>
- 配置文件,需要两个配置文件:application.yml 和 bootstrap.yml
application.yml:
spring:
	application:
		name: config-git
server:
	port: 13000
bootstrap.yml
spring:
	cloud:
		config:
			uri: http://localhost:12000 # 配置中心的具体地址,即 config-server
			name: config-client # 对应 {application} 部分
			profile: dev # 对应 {profile} 部分
			label: master # 对应 {label} 部分,即 Git 的分支。如果配置中心使用的是本地存储,则该参数无用
上面这些与Spring Cloud Config相关的属性必须配置在bootstrap.yml中,config部分内容才能被正确加载。因为config的相关配置会先于application.yml,而bootstrap.yml的加载也是先于 application.yml。
- 启动类不用修改,只用@SpringBootApplication就行了,注意不同包下要配置扫描
@SpringBootApplication(scanBasePackages = {"com.xm"})
public class SpringCloudConfigClientApplication {
		public static void main(String[] args) {
				SpringApplication.run(SpringCloudConfigClientApplication.class,args);
		}
}
- 在 Controller 中使用 @Value 注解来获取 Server 端参数的值
@RestController
public class HelloController {

		@Value("${info.profile:error}") //:后面表示默认值
		private String profile;

		@RequestMapping(value = "/info",method = RequestMethod.GET)
		public String hello(){
				return profile;
		}
}
启动项目后访问http://localhost:13000/info返回dev说明已经正确的从Server端获取到了参数。
Spring Cloud Config 分服务端和客户端,服务端负责将 Git 中存储的配置文件发布成 REST 接口,客户端可以从服务端 REST 接口获取配置。但客户端并不能主动感知到配置的变化,从而主动去获取新的配置。客户端如何去主动获取新的配置信息呢,Spring Cloud 已经给我们提供了解决方案,每个客户端通过POST方法触发各自的/actuator/refresh。
Refresh
仅修改客户端即 config-client 项目,就可以实现 refresh 的功能。
- 添加依赖:
<dependency>
		<groupId>org.springframework.boot</groupId>
		<artifactId>spring-boot-starter-actuator</artifactId>
</dependency>
增加了spring-boot-starter-actuator包,spring-boot-starter-actuator是一套监控的功能,可以监控程序在运行时状态,其中就包括/actuator/refresh的功能。
开启更新机制
需要给加载变量的类上面加载@RefreshScope,在客户端执行/actuator/refresh的时候就会更新此类下面的变量值。
@RestController
@RefreshScope
public class HelloController {

		@Value("${info.profile:error}") //:后面表示默认值
		private String profile;

		@RequestMapping(value = "/info",method = RequestMethod.GET)
		public String hello(){
				return profile;
		}
}
配置
Spring Boot 1.5.X 以上默认开通了安全认证,所以要在配置文件application.yml中添加以下配置以将 /actuator/refresh这个Endpoint暴露出来:
management:
	endpoints:
		web:
			exposure:
		include: refresh
重启config-client,以POST请求的方式来访问http://localhost:13000/actuator/refresh就会更新配置文件至最新版本。
配置服务化和高可用
把 config-server 也注册为服务,这样所有客户端就能以服务的方式进行访问。通过这种方法,只需要启动多个指向同一Git仓库位置的config-server就能实现高可用了。
服务端改造
- 增加以下依赖:
<dependency>
		<groupId>org.springframework.cloud</groupId>
		<artifactId>spring-cloud-starter-netflix-eureka-client</artifactId>
</dependency>
- 修改配置文件增加Eureka配置:
eureka:
	client:
		service-url:
			defaultZone: http://localhost:7000/eureka/
启动后就可以在注册中心看到服务端服务了
客户端改造
- 增加以下依赖:
<dependency>
		<groupId>org.springframework.cloud</groupId>
		<artifactId>spring-cloud-starter-netflix-eureka-client</artifactId>
</dependency>
- 修改配置文件bootstrap.yml:
spring:
	cloud:
		config:
#      uri: http://localhost:12000 # 配置中心的具体地址,即config-server
			name: config-client
			profile: dev # 对应 {profile} 部分
			label: master # 对应 {label} 部分,即 Git 的分支。如果配置中心使用的是本地存储,则该参数无用
			discovery:
				enabled: true
				service-id: config-server
eureka:
	client:
		service-url:
			defaultZone: http://localhost:7000/eureka/
主要是去掉了spring.cloud.config.uri直接指向Server端地址的配置,增加了最后的三个配置:
spring.cloud.config.discovery.enabled:开启 Config 服务发现支持spring.cloud.config.discovery.serviceId:指定 Server 端的name, 也就是Server端spring.application.name的值eureka.client.service-url.defaultZone:指向配置中心的地址
这三个配置文件都需要放到 bootstrap.yml 的配置中。
启动 Client 端,在浏览器中访问http://localhost:7000/就会看到 Server 端和 Client 端都已经注册了到注册中心了。
之后分别以不同端口启动服务端,就可以实现高可用了。
服务网关Zuul(路由)
在微服务架构中,后端服务往往不直接开放给调用端,而是通过一个 API 网关根据请求的 URL,路由到相应的服务。当添加 API 网关后,在第三方调用端和服务提供方之间就创建了一面墙,这面墙直接与调用方通信进行权限控制,后将请求均衡分发给后台服务端。
在 Spring Cloud 体系中, Spring Cloud Zuul 就是提供负载均衡、反向代理、权限认证的一个 API Gateway。
Spring Cloud Zuul 路由是微服务架构的不可或缺的一部分,提供动态路由、监控、弹性、安全等的边缘服务。Zuul 是 Netflix 出品的一个基于 JVM 路由和服务端的负载均衡器。
使用步骤
- 创建一个spring boot项目,命名为
api-gateway,pom依赖如下:
<dependency>
		<groupId>org.springframework.cloud</groupId>
		<artifactId>spring-cloud-starter-netflix-zuul</artifactId>
</dependency>
<dependency>
		<groupId>org.springframework.cloud</groupId>
		<artifactId>spring-cloud-starter-netflix-eureka-client</artifactId>
</dependency>
- 配置文件如下:在配置文件 application.yml 中加入服务名、端口号、Eureka 注册中心的地址
spring:
	application:
		name: api-gateway
server:
	port: 14000
eureka:
	client:
		service-url:
			defaultZone: http://localhost:7000/eureka/
- 启动类使用
@EnableZuulProxy注解开启Zuul功能
@EnableZuulProxy
@SpringBootApplication
public class ApiGatewayApplication {
		public static void main(String[] args) {
				SpringApplication.run(ApiGatewayApplication.class,args);
		}
}
启动服务注册中心,服务提供者,消费者,网关后就可以在注册中心看到相应服务。
默认情况下,zuul的转发规则如下:(对应服务提供者和消费者配置的服务名称)
- 转发到producer服务的请求规则为:
/eureka-producer/** - 转发到consumer服务的请求规则为:
/eureka-consumer/**
也可以在配置文件自定义转发规则:
zuul:
	routes:
		api-a:
			path: /api/a/**
			serviceId: hello-spring-cloud-web-admin-ribbon
		api-b:
			path: /api/b/**
			serviceId: hello-spring-cloud-web-admin-feign
最后访问http://localhost:14000/eureka-producer/hello/?name=xm,该请求最终就会被路由到consumer/hello接口上
服务网关Zuul(过滤器)
为了在 API 网关中实现对客户端请求的校验,需要使用到Spring Cloud Zuul的另外一个核心功能:过滤器。
Filter 的生命周期有 4 个,分别是 “PRE”、“ROUTING”、“POST” 和 “ERROR”:
Zuul 大部分功能都是通过过滤器来实现的,这些过滤器类型对应于请求的典型生命周期。
PRE:这种过滤器在请求被路由之前调用。我们可利用这种过滤器实现身份验证、在集群中选择请求的微服务、记录调试信息等。ROUTING:这种过滤器将请求路由到微服务。这种过滤器用于构建发送给微服务的请求,并使用 Apache HttpClient 或 Netfilx Ribbon 请求微服务。POST:这种过滤器在路由到微服务以后执行。这种过滤器可用来为响应添加标准的 HTTP Header、收集统计信息和指标、将响应从微服务发送给客户端等。ERROR:在其他阶段发生错误时执行该过滤器。 除了默认的过滤器类型,Zuul 还允许我们创建自定义的过滤器类型。例如,我们可以定制一种 STATIC 类型的过滤器,直接在 Zuul 中生成响应,而不将请求转发到后端的微服务。
Zuul 中默认实现的 Filter
| 类型 | 顺序 | 过滤器 | 功能 |
|---|---|---|---|
| pre | -3 | ServletDetectionFilter | 标记处理 Servlet 的类型 |
| pre | -2 | Servlet30WrapperFilter | 包装 HttpServletRequest 请求 |
| pre | -1 | FormBodyWrapperFilter | 包装请求体 |
| route | 1 | DebugFilter | 标记调试标志 |
| route | 5 | PreDecorationFilter | 处理请求上下文供后续使用 |
| route | 10 | RibbonRoutingFilter | serviceId 请求转发 |
| route | 100 | SimpleHostRoutingFilter | url 请求转发 |
| route | 500 | SendForwardFilter | forward 请求转发 |
| post | 0 | SendErrorFilter | 处理有错误的请求响应 |
| post | 1000 | SendResponseFilter | 处理正常的请求响应 |
禁用指定的 Filter
可以在application.yml中配置需要禁用的 filter,格式为:zuul.<SimpleClassName>.<filterType>.disable=true。
比如要禁用org.springframework.cloud.netflix.zuul.filters.post.SendResponseFilter就设置
zuul:
	SendResponseFilter:
		post:
			disable: true
自定义Filter
首先自定义一个 Filter,继承ZuulFilter抽象类,在run ()方法中验证参数是否含有Token,具体如下:
@Component
public class TokenFilter extends ZuulFilter {

		/**
		 * 过滤器的类型,它决定过滤器在请求的哪个生命周期中执行
		 * @return
		 */
		@Override
		public String filterType() {
				return "pre";
		}

		/**
		 * filter执行顺序,通过数字指定
		 * 数字越大,优先级越低
		 * @return
		 */
		@Override
		public int filterOrder() {
				return 0;
		}

		/**
		 * 判断该过滤器是否需要被执行。
		 * 实际运用中可以通过该函数指定过滤器的有效范围
		 * @return
		 */
		@Override
		public boolean shouldFilter() {
				return true;
		}

		/**
		 * 过滤器的具体逻辑
		 * @return
		 * @throws ZuulException
		 */
		@Override
		public Object run() throws ZuulException {
				RequestContext ctx = RequestContext.getCurrentContext();
				HttpServletRequest request = ctx.getRequest();

				String token = request.getParameter("token");
				if(token == null || token.isEmpty()){
						ctx.setSendZuulResponse(false);
						ctx.setResponseStatusCode(401);
						ctx.setResponseBody("token is empty");
				}
				return null;
		}
}
在上面实现的过滤器代码中,通过继承ZuulFilter抽象类并重写了下面的四个方法来实现自定义的过滤器。这四个方法分别定义了:
filterType():过滤器的类型,它决定过滤器在请求的哪个生命周期中执行。这里定义为 pre,代表会在请求被路由之前执行。filterOrder():过滤器的执行顺序。当请求在一个阶段中存在多个过滤器时,需要根据该方法返回的值来依次执行。通过数字指定,数字越大,优先级越低。shouldFilter():判断该过滤器是否需要被执行。这里直接返回了 true,因此该过滤器对所有请求都会生效。实际运用中我们可以利用该函数来指定过滤器的有效范围。run():过滤器的具体逻辑。这里通过ctx.setSendZuulResponse(false)令 Zuul 过滤该请求,不对其进行路由,然后通过ctx.setResponseStatusCode(401)设置了其返回的错误码,当然也可以进一步优化返回,比如,通过ctx.setResponseBody(body)对返回body内容进行编辑等。
在实现了自定义过滤器之后,它并不会直接生效,还需要为其创建具体的 Bean 才能启动该过滤器,比如,在应用主类中增加如下内容:
@EnableZuulProxy
@SpringBootApplication(scanBasePackages = {"com.xm"})
public class ApiGatewayApplication {
		public static void main(String[] args) {
				SpringApplication.run(ApiGatewayApplication.class,args);
		}

		@Bean
		public TokenFilter tokenFilter(){
				return new TokenFilter();
		}
}
之后可以通过http://localhost:14000/eureka-producer/hello/?name=xm&&token=token进行测试。
分布式链路跟踪Sleuth与Zipkin
随着业务发展,系统拆分导致系统调用链路愈发复杂一个前端请求可能最终需要调用很多次后端服务才能完成,当整个请求变慢或不可用时,我们是无法得知该请求是由某个或某些后端服务引起的,这时就需要解决如何快读定位服务故障点,以对症下药。于是就有了分布式系统调用跟踪的诞生。
Spring Cloud Sleuth 提供了一套完整的解决方案。
Spring Cloud Sleuth
一般的,一个分布式服务跟踪系统主要由三部分构成:
- 数据收集
- 数据存储
- 数据展示
根据系统大小不同,每一部分的结构又有一定变化。譬如,对于大规模分布式系统,数据存储可分为实时数据和全量数据两部分,实时数据用于故障排查(Trouble Shooting),全量数据用于系统优化;数据收集除了支持平台无关和开发语言无关系统的数据收集,还包括异步数据收集(需要跟踪队列中的消息,保证调用的连贯性),以及确保更小的侵入性;数据展示又涉及到数据挖掘和分析。虽然每一部分都可能变得很复杂,但基本原理都类似。
服务追踪的追踪单元是从客户发起请求(request)抵达被追踪系统的边界开始,到被追踪系统向客户返回响应(response)为止的过程,称为一个trace。
每个trace中会调用若干个服务,为了记录调用了哪些服务,以及每次调用的消耗时间等信息,在每次调用服务时,埋入一个调用记录,称为一个span。
这样,若干个有序的span就组成了一个trace。在系统向外界提供服务的过程中,会不断地有请求和响应发生,也就会不断生成trace,把这些带有span的trace记录下来,就可以描绘出一幅系统的服务拓扑图。附带上span中的响应时间,以及请求成功与否等信息,就可以在发生问题的时候,找到异常的服务;根据历史数据,还可以从系统整体层面分析出哪里性能差,定位性能优化的目标。
Spring Cloud Sleuth为服务之间调用提供链路追踪。通过Sleuth可以很清楚的了解到一个服务请求经过了哪些服务,每个服务处理花费了多长。从而让我们可以很方便的理清各微服务间的调用关系。此外 Sleuth 可以帮助进行: - 耗时分析:通过 Sleuth 可以很方便的了解到每个采样请求的耗时,从而分析出哪些服务调用比较耗时;
- 可视化错误:对于程序未捕捉的异常,可以通过集成 Zipkin 服务界面上看到;
- 链路优化:对于调用比较频繁的服务,可以针对这些服务实施一些优化措施。
Spring Cloud Sleuth可以结合Zipkin,将信息发送到Zipkin,利用Zipkin的存储来存储信息,利用 Zipkin UI来展示数据。
术语解释
Span:基本工作单元,例如,在一个新建的Span中发送一个RPC等同于发送一个回应请求给RPC,Span 通过一个64位ID唯一标识,Trace以另一个64位ID表示。Trace:一系列Spans组成的一个树状结构,例如,如果你正在运行一个分布式大数据工程,你可能需要创建一个Trace。Annotation:用来即使记录一个事件的存在,一些核心 Annotations 用来定义一个请求的开始和结束cs:Client Sent,客户端发起一个请求,这个 Annotation 描述了这个 Span 的开始sr:Server Received,服务端获得请求并准备开始处理它,如果将其 sr 减去 cs 时间戳便可得到网络延迟ss:Server Sent 表明请求处理的完成(当请求返回客户端),如果 ss 减去 sr 时间戳便可得到服务端需要的处理请求时间cr:Client Received 表明 Span 的结束,客户端成功接收到服务端的回复,如果 cr 减去 cs 时间戳便可得到客户端从服务端获取回复的所有所需时间
Zipkin
Zipkin 是 Twitter 的一个开源项目,它基于 Google Dapper 实现,它致力于收集服务的定时数据,以解决微服务架构中的延迟问题,包括数据的收集、存储、查找和展现。
我们可以使用它来收集各个服务器上请求链路的跟踪数据,并通过它提供的 REST API 接口来辅助我们查询跟踪数据以实现对分布式系统的监控程序,从而及时地发现系统中出现的延迟升高问题并找出系统性能瓶颈的根源。除了面向开发的 API 接口之外,它也提供了方便的 UI 组件来帮助我们直观的搜索跟踪信息和分析请求链路明细,比如:可以查询某段时间内各用户请求的处理时间等。
Zipkin 提供了可插拔数据存储方式:In-Memory、MySql、Cassandra 以及 Elasticsearch。
Zipkin主要由 4 个核心组件构成:
Collector:收集器组件,它主要用于处理从外部系统发送过来的跟踪信息,将这些信息转换为 Zipkin 内部处理的 Span 格式,以支持后续的存储、分析、展示等功能。Storage:存储组件,它主要对处理收集器接收到的跟踪信息,默认会将这些信息存储在内存中,我们也可以修改此存储策略,通过使用其他存储组件将跟踪信息存储到数据库中。RESTful API:API 组件,它主要用来提供外部访问接口。比如给客户端展示跟踪信息,或是外接系统访问以实现监控等。Web UI:UI 组件,基于 API 组件实现的上层应用。通过 UI 组件用户可以方便而有直观地查询和分析跟踪信息。
Zipkin 分为两端,一个是 Zipkin 服务端,一个是 Zipkin 客户端,客户端也就是微服务的应用。
客户端会配置服务端的 URL 地址,一旦发生服务间的调用的时候,会被配置在微服务里面的 Sleuth 的监听器监听,并生成相应的 Trace 和 Span 信息发送给服务端。
发送的方式主要有两种,一种是 HTTP 报文的方式,还有一种是消息总线的方式如 RabbitMQ。
不论哪种方式,我们都需要:
- 一个 Eureka 服务注册中心
- 一个 Zipkin 服务端。
- 两个微服务应用,trace-a 和 trace-b,其中trace-a中有一个 REST 接口
/trace-a,调用该接口后将触发对trace-b应用的调用。
使用方式:
关于 Zipkin 的服务端,在使用 Spring Boot 2.x 版本后,官方就不推荐自行定制编译了,反而是直接提供了编译好的 jar 包来给我们使用,可以使用脚本编译运行,或者使用docker:
curl -sSL https://zipkin.io/quickstart.sh | bash -s
java -jar zipkin.jar
或者
docker run -d -p 9411:9411 openzipkin/zipkin
在需要zipkin的客户端加入依赖
<dependency>
		<groupId>org.springframework.cloud</groupId>
		<artifactId>spring-cloud-starter-zipkin</artifactId>
</dependency>
之后在配置文件加入Zipkin Server 的地址即可:
spring:
	zipkin:
		base-url: http://localhost:9411
Spring Cloud GateWay
Spring Cloud Gateway 是 Spring Cloud 的一个全新项目,该项目是基于 Spring 5.0,Spring Boot 2.0 和 Project Reactor 等技术开发的网关,它旨在为微服务架构提供一种简单有效的统一的API路由管理方式。
Spring Cloud Gateway 作为 Spring Cloud 生态系统中的网关,目标是替代 Netflix Zuul,其不仅提供统一的路由方式,并且基于 Filter 链的方式提供了网关基本的功能,例如:安全、监控、埋点和限流等。
术语
Route(路由):这是网关的基本构建块。它由一个 ID,一个目标 URI,一组断言和一组过滤器定义。如果断言为真,则路由匹配。Predicate(断言):这是一个 Java 8 的 Predicate。输入类型是一个ServerWebExchange。我们可以使用它来匹配来自 HTTP 请求的任何内容,例如 headers 或参数。Filter(过滤器):这是org.springframework.cloud.gateway.filter.GatewayFilter的实例,我们可以使用它修改请求和响应。
客户端向Spring Cloud Gateway发出请求。然后在Gateway Handler Mapping中找到与请求相匹配的路由,将其发送到Gateway Web Handler。Handler再通过指定的过滤器链来将请求发送到我们实际的服务执行业务逻辑,然后返回。过滤器之间可能会在发送代理请求之前(“pre”)或之后(“post”)执行业务逻辑。
GateWay作为路由使用步骤
- 创建一个SpringBoot工程,命名为gateway,引入以下依赖:
<dependency>
		<groupId>org.springframework.cloud</groupId>
		<artifactId>spring-cloud-starter-gateway</artifactId>
</dependency>
<dependency>
		<groupId>org.springframework.cloud</groupId>
		<artifactId>spring-cloud-starter-netflix-eureka-client</artifactId>
</dependency>
- application配置文件如下:
spring:
	application:
		name: cloud-gateway
	cloud:
		gateway:
			discovery:
				locator:
					enabled: true
			routes:
				- id: default_path_to_http
					uri: https://xiao-ming9.github.io
					order: 10000
					predicates:
						- Path=/**
					filters:
						- SetPath=/
server:
	port: 30000
eureka:
	client:
		service-url:
			defaultZone: http://localhost:7000/eureka/
logging:
	level:
		org.springframework.cloud.gateway: debug
配置说明:
spring.cloud.gateway.discovery.locator.enabled:是否与服务注册发现组件进行结合,通过 serviceId 转发到具体的服务实例。默认为 false,设为 true 便开启通过服务中心的自动根据 serviceId 创建路由的功能。spring.cloud.gateway.routes用于配合具体的路由规则,是一个数组。这里我创建了一个 id 为 default_path_to_http 的路由,其中的配置是将未匹配的请求转发到 https://windmt.com。- 网关服务监听 30000 端口
- 指定注册中心的地址,以便使用服务发现功能
- 调整相关包的 log 级别,以便排查问题
- 启动类不用做什么修改,启动即可,此时可以在注册中心看到网关服务。
输入http://localhost:30000/EUREKA-CONSUMER/hello/?name=xm进行测试使用Gateway需要使用大写的路径
此时控制台输出如下:
2019-08-26 23:00:24.315 DEBUG 2999 --- [ctor-http-nio-2] o.s.c.g.h.RoutePredicateHandlerMapping : Mapping [Exchange: GET http://localhost:30000/EUREKA-CONSUMER/hello/?name=xm] to Route{id='CompositeDiscoveryClient_EUREKA-CONSUMER', uri=lb://EUREKA-CONSUMER, order=0, predicate=org.springframework.cloud.gateway.support.ServerWebExchangeUtils$$Lambda$599/0x0000000800684040@31cea2ce, gatewayFilters=[OrderedGatewayFilter{delegate=org.springframework.cloud.gateway.filter.factory.RewritePathGatewayFilterFactory$$Lambda$601/0x0000000800683840@2f4b7040, order=1}]}
通过输出信息可以看出,Spring Cloud Gateway自动为消费者服务创建了一个路由,内容大概如下:
routes:
	- id: CompositeDiscoveryClient_EUREKA-CONSUMER
		uri: lb://EUREKA-CONSUMER
		order: 0
		predicate:
			- Path:/EUREKA-CUSTOMER/**
		filters:
			- RewritePath=/EUREKA-CUSTOMER/(?<segment>.*),/$\{segment}
自定义路由规则
修改配置如下,增加一个routes如下:
routes:
	- id: service_customer
		uri: lb://EUREKA-CONSUMER
		order: 0
		predicates:
			- Path=/customer/**
		filters:
			- StripPrefix=1
			- AddResponseHeader=X-Response-Default-Foo,Default-Bar
新增的StripPrefix可以接受一个非负整数,对应的具体实现是StripPrefixGatewayFilterFactory,从名字就可以看出它的作用是去掉前缀的,那个整数即对应层数。具体到本例中,通过 Spring Cloud Gateway 访问/customer/hello/?name=xm,那么当网关服务向后转发请求时,会去掉/customer,微服务收到的就是/hello/?name=xm,同时还会加上响应头。
Spring Boot Admin
Spring Boot Admin 在Spring Boot Actuator的基础上提供简洁的可视化WEB UI,是用来管理Spring Boot应用程序的一个简单的界面,提供如下功能:
- 显示 name/id 和版本号
- 显示在线状态
- Logging 日志级别管理
- JMX beans 管理
- Threads 会话和线程管理
- Trace 应用请求跟踪
- 应用运行参数信息,如:Java 系统属性,Java 环境变量属性,内存信息,Spring 环境属性
创建服务端
- 创建一个Spring Boot项目导入以下依赖:
<dependency>
		<groupId>de.codecentric</groupId>
		<artifactId>spring-boot-admin-starter-server</artifactId>
		<version>2.0.1</version>
</dependency>
<dependency>
		<groupId>org.springframework.cloud</groupId>
		<artifactId>spring-cloud-starter-netflix-eureka-client</artifactId>
</dependency>
- 使用
@EnableAdminServe修饰启动类
@SpringBootApplication(scanBasePackages = {"com.xm"})
@EnableAdminServer
public class AdminServerApplication {
		public static void main(String[] args) {
				SpringApplication.run(AdminServerApplication.class,args);
		}
}
- 配置信息
application.yml
spring:
	application:
		name: admin-server
server:
	port: 18080
eureka:
	client:
		service-url:
			defaultZone: ${EUREKA_SERVICE_URL:http://localhost:7000}/eureka/
创建客户端
在建立了服务端之后,可以将一个Spring Boot应用程序注册为客户端。
注册客户端有两种方式,一种就是通过引入 SBA Client,另外一种是基于Spring Cloud Discovery。
SBA Client
- 引入以下依赖:
<dependency>
		<groupId>de.codecentric</groupId>
		<artifactId>spring-boot-admin-starter-client</artifactId>
		<version>2.0.1</version>
</dependency>
- 配置文件:
spring:
	application:
		name: user
	boot:
		admin:
			client:
				url: http://localhost:18080
eureka:
	instance:
		leaseRenewalIntervalInSeconds: 10
		health-check-url-path: /actuator/health
	client:
		registryFetchIntervalSeconds: 5
		service-url:
			defaultZone: ${EUREKA_SERVICE_URL:http://localhost:7000}/eureka/
management:
	endpoints:
		web:
			exposure:
				include: '*'
	endpoint:
		health:
			show-details: ALWAYS
Spring Cloud Discovery
如果项目中使用了 Spring Cloud,并不用通过 SBA Client 来向 SBA 注册,而是让SBA通过注册中心(Eureka、Consul 等)来发现服务。
这里以 Eureka 作为注册中心来说明。首先向SBA服务端以及客户端中添加Eureka Client的依赖
<dependency>
		<groupId>org.springframework.cloud</groupId>
		<artifactId>spring-cloud-starter-netflix-eureka-client</artifactId>
</dependency>
然后照常在 application.yml 中配置 Eureka 的注册信息,如下
eureka:
	instance:
		leaseRenewalIntervalInSeconds: 10
		health-check-url-path: /actuator/health
	client:
		registryFetchIntervalSeconds: 5
		serviceUrl:
			defaultZone: ${EUREKA_SERVICE_URL:http://localhost:8761}/eureka/
management:
	endpoints:
		web:
			exposure:
				include: '*'
	endpoint:
		health:
			show-details: ALWAYS
安全配置
SBA 服务端可以访问客户端的敏感端点,因此手册上 建议我们应该为服务端和客户端添加一些安全配置。
服务端安全配置
- 首先向服务端添加Spring Security依赖(此时服务端已引入web相关包)
<dependency>
		<groupId>org.springframework.boot</groupId>
		<artifactId>spring-boot-starter-security</artifactId>
</dependency>
- 创建配置类:
@Configuration
public class SecuritySecureConfig extends WebSecurityConfigurerAdapter {

		private final String adminContextPath;

		public SecuritySecureConfig(AdminServerProperties adminServerProperties){
				this.adminContextPath = adminServerProperties.getContextPath();
		}

		@Override
		protected void configure(HttpSecurity http) throws Exception {
				SavedRequestAwareAuthenticationSuccessHandler successHandler = new SavedRequestAwareAuthenticationSuccessHandler();
				successHandler.setTargetUrlParameter("redirectTo");

				http.authorizeRequests()
								.antMatchers(adminContextPath + "/assets/**").permitAll()//	授予对所有静态资产和登录页面的公共访问权限。
								.antMatchers(adminContextPath + "/login").permitAll()
								.anyRequest().authenticated()//必须对每个其他请求进行身份验证。
								.and()
								.formLogin().loginPage(adminContextPath + "/login").successHandler(successHandler).and()
								.logout().logoutUrl(adminContextPath + "/logout").and()//配置登录和注销。
								.httpBasic().and()//启用HTTP-Basic支持。这是Spring Boot Admin Client注册所必需的。
								.csrf().disable();//使用Cookie启用CSRF保护
		}
}
- 通过配置文件设置账号密码
spring:
	security:
		user:
			name: 'admin'
			password: 'admin'
启动后访问就需要账号密码登陆了
如果这时客户端是使用的 SBA Client 的方式,会注意到客户端这时已无法再注册到服务端了(Spring Cloud Discovery 的话不受影响)。为了能将客户端注册到服务端,还必须在客户端的配置文件中添加以下内容:
spring.boot.admin.client:
	username: 'admin'
	password: 'admin'
客户端的安全配置
SBA客户端
- 增加客户端配置如下:
spring:
	application:
		name: user
	security:
		user:
			name: 'client'
			password: 'client'
	boot:
		admin:
			client:
				url: http://localhost:18080
				username: 'admin'
				password: 'admin'
				instance:
					metadata:
						user.name: ${spring.security.user.name}
						user.password: ${spring.security.user.password}
- 服务端的配置中增加以下内容
eureka:
	instance:
		metadata-map:
			user.name: 'client'
			user.password: 'client'
Spring Cloud Diccovery
- 客户端配置:
spring:
	application:
		name: user
	security:
		user:
			name: 'client'
			password: 'client'
eureka:
	instance:
		leaseRenewalIntervalInSeconds: 10
		health-check-url-path: /actuator/health
		metadata-map:
			user.name: ${spring.security.user.name}
			user.password: ${spring.security.user.password}
	client:
		registryFetchIntervalSeconds: 5
		service-url:
			defaultZone: ${EUREKA_SERVICE_URL:http://localhost:7000}/eureka/
management:
	endpoints:
		web:
			exposure:
				include: '*'
	endpoint:
		health:
			show-details: ALWAYS
- 服务端:
spring:
	application:
		name: admin-server
	security:
		user:
			name: 'admin'
			password: 'admin'
server:
	port: 18080
eureka:
	client:
		registryFetchIntervalSeconds: 5
		service-url:
			defaultZone: ${EUREKA_SERVICE_URL:http://localhost:7000}/eureka/
	instance:
		leaseRenewalIntervalInSeconds: 10
		health-check-url-path: /actuator/health
		metadata-map:
			user.name: ${spring.security.user.name}
			user.password: ${spring.security.user.password}

management:
	endpoints:
		web:
			exposure:
				include: '*'
	endpoint:
		health:
			show-details: ALWAYS
Eureka中的metadataMap是专门用来存放一些自定义的数据,当注册中心或者其他服务需要此服务的某些配置时可以在 metadataMap 里取。实际上,每个instance都有各自的 metadataMap,map 中存放着需要用到的属性。例如,上面配置中的
eureka.instance.metadata-map.user.name,当这个服务成功注册到 Eureka 上,Spring Boot Admin 就会取拿到这个 instance,进而拿到 metadataMap 里的属性,然后放入请求头,向此服务发送请求,访问此服务的Actuator开放的端点。