SpringMVC
SpringMVC工作流程
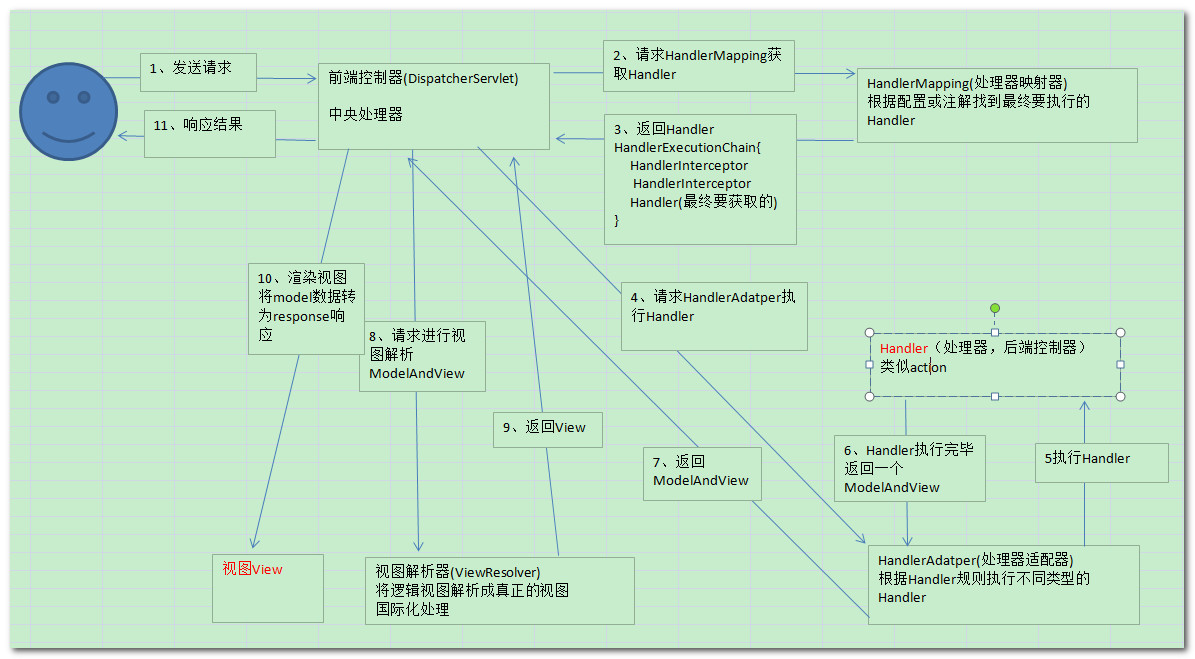
- 用户发送的请求首先都会被前端控制器(中央控制器)
DispatcherServlet捕获 - 中央控制器通过处理器映射器
HandleMapping找到对应的处理器返回给中央控制器 - 中央控制器根据返回的处理器调用处理器适配器
HandleAdapter,处理器适配器经过适配调用具体的Controller,并将得到的ModelAndView返回给中央控制器 - 中央控制器将结果传递给视图解析器
ViewReslover - 视图解析器解析后返回具体视图
开发流程
- 需要导入的包:
<dependencies>
    <dependency>
        <groupId>org.springframework</groupId>
        <artifactId>spring-core</artifactId>
        <version>5.1.7.RELEASE</version>
    </dependency>

    <dependency>
        <groupId>org.springframework</groupId>
        <artifactId>spring-context</artifactId>
        <version>5.1.7.RELEASE</version>
    </dependency>

    <dependency>
        <groupId>org.springframework</groupId>
        <artifactId>spring-aspects</artifactId>
        <version>5.1.7.RELEASE</version>
    </dependency>

    <dependency>
        <groupId>org.springframework</groupId>
        <artifactId>spring-jdbc</artifactId>
        <version>5.1.7.RELEASE</version>
    </dependency>

    <dependency>
        <groupId>org.springframework</groupId>
        <artifactId>spring-test</artifactId>
        <version>5.1.7.RELEASE</version>
    </dependency>

    <dependency>
        <groupId>org.springframework</groupId>
        <artifactId>spring-web</artifactId>
        <version>5.1.7.RELEASE</version>
    </dependency>

    <dependency>
        <groupId>org.springframework</groupId>
        <artifactId>spring-webmvc</artifactId>
        <version>5.1.7.RELEASE</version>
    </dependency>

    <dependency>
        <groupId>org.springframework</groupId>
        <artifactId>spring-expression</artifactId>
        <version>5.1.7.RELEASE</version>
    </dependency>

    <dependency>
        <groupId>org.springframework</groupId>
        <artifactId>spring-aop</artifactId>
        <version>5.1.7.RELEASE</version>
    </dependency>

    <dependency>
        <groupId>org.springframework</groupId>
        <artifactId>spring-beans</artifactId>
        <version>5.1.7.RELEASE</version>
    </dependency>

    <dependency>
        <groupId>javax.servlet</groupId>
        <artifactId>javax.servlet-api</artifactId>
        <version>4.0.1</version>
        <scope>provided</scope>
    </dependency>

    <dependency>
        <groupId>javax.servlet.jsp</groupId>
        <artifactId>javax.servlet.jsp-api</artifactId>
        <version>2.3.3</version>
        <scope>provided</scope>
    </dependency>

    <dependency>
        <groupId>javax.servlet.jsp.jstl</groupId>
        <artifactId>jstl</artifactId>
        <version>1.2</version>
    </dependency>

    <dependency>
        <groupId>org.apache.taglibs</groupId>
        <artifactId>taglibs-standard-jstlel</artifactId>
        <version>1.2.5</version>
        <scope>provided</scope>
    </dependency>
</dependencies>
运行后需要检查tomat相关的out文件lib目录下是否也已经导入,如果没有需要手动加入(project structure->artifacts->在lib目录下添加
- 项目目录结构

- 配置中央控制器:在
web.xml文件中进行配置
?xml version="1.0" encoding="UTF-8"?>
<web-app xmlns="http://xmlns.jcp.org/xml/ns/javaee"
         xmlns:xsi="http://www.w3.org/2001/XMLSchema-instance"
         xsi:schemaLocation="http://xmlns.jcp.org/xml/ns/javaee http://xmlns.jcp.org/xml/ns/javaee/web-app_4_0.xsd"
         version="4.0">

    <!-- 配置过滤器 -->
    <filter>
        <filter-name>myfilter</filter-name>
        <filter-class>org.springframework.web.filter.CharacterEncodingFilter</filter-class>

        <!-- 指定编码 -->
        <init-param>
            <param-name>encoding</param-name>
            <param-value>utf-8</param-value>
        </init-param>
        <!-- 启动强编码 -->
        <init-param>
            <param-name>forceEncoding</param-name>
            <param-value>true</param-value>
        </init-param>
    </filter>
    <filter-mapping>
        <filter-name>myfilter</filter-name>
        <url-pattern>/*</url-pattern>
    </filter-mapping>

    <servlet>
        <servlet-name>springmvc</servlet-name>
        <!-- 关联中央处理器 -->
        <servlet-class>org.springframework.web.servlet.DispatcherServlet</servlet-class>
        <!-- 读取springmvc的配置文件 -->
        <init-param>
            <param-name>contextConfigLocation</param-name>
            <param-value>classpath:applicationContext.xml</param-value>
        </init-param>
    </servlet>
    <servlet-mapping>
        <servlet-name>springmvc</servlet-name>
        <url-pattern>*.do</url-pattern>
    </servlet-mapping>

</web-app>
- 配置处理器映射器,处理器适配器,视图解析器:在spring配置文件中进行配置
<?xml version="1.0" encoding="UTF-8"?>
<beans xmlns="http://www.springframework.org/schema/beans"
       xmlns:mvc="http://www.springframework.org/schema/mvc"
       xmlns:xsi="http://www.w3.org/2001/XMLSchema-instance"
       xsi:schemaLocation="
        http://www.springframework.org/schema/beans
        https://www.springframework.org/schema/beans/spring-beans.xsd
        http://www.springframework.org/schema/mvc
        https://www.springframework.org/schema/mvc/spring-mvc.xsd">

    <!-- 配置处理器映射器 -->
    <bean class="org.springframework.web.servlet.handler.BeanNameUrlHandlerMapping"></bean>
    <!-- 配置处理器适配器 -->
    <bean class="org.springframework.web.servlet.mvc.SimpleControllerHandlerAdapter"></bean>
    <!-- 配置视图解析器 -->
    <bean class="org.springframework.web.servlet.view.InternalResourceViewResolver"></bean>


    <!-- 配置action -->
    <bean name="/hello.do" class="com.xm.action.HelloAction"></bean>

</beans>
- 开发模型层
package com.xm.action;

import org.springframework.web.servlet.ModelAndView;
import org.springframework.web.servlet.mvc.Controller;

import javax.servlet.http.HttpServletRequest;
import javax.servlet.http.HttpServletResponse;

/**
 * 控制层
 */
public class HelloAction implements Controller {
    @Override
    public ModelAndView handleRequest(HttpServletRequest httpServletRequest, HttpServletResponse httpServletResponse) throws Exception {
        ModelAndView mv = new ModelAndView();
        //可以返回视图+数据
        mv.addObject("hello","SpringMVC world!");
        //返回跳转的地址
        mv.setViewName("index.jsp");
        return mv;
    }
}
- 开发视图层
<%@ page contentType="text/html;charset=UTF-8" language="java" %>
<html>
  <head>
    <title>springMVC</title>
  </head>
  <body>
  ${hello}
  </body>
</html>
SpringMVC配置方式
第一种方式(通过name找到Controller):
- 配置前端控制器:
<web-app xmlns="http://xmlns.jcp.org/xml/ns/javaee"
         xmlns:xsi="http://www.w3.org/2001/XMLSchema-instance"
         xsi:schemaLocation="http://xmlns.jcp.org/xml/ns/javaee http://xmlns.jcp.org/xml/ns/javaee/web-app_4_0.xsd"
         version="4.0">

    <!-- 配置过滤器 -->
    <filter>
        <filter-name>myfilter</filter-name>
        <filter-class>org.springframework.web.filter.CharacterEncodingFilter</filter-class>

        <!-- 指定编码 -->
        <init-param>
            <param-name>encoding</param-name>
            <param-value>utf-8</param-value>
        </init-param>
        <!-- 启动强编码 -->
        <init-param>
            <param-name>forceEncoding</param-name>
            <param-value>true</param-value>
        </init-param>
    </filter>
    <filter-mapping>
        <filter-name>myfilter</filter-name>
        <url-pattern>/*</url-pattern>
    </filter-mapping>

    <servlet>
        <servlet-name>springmvc</servlet-name>
        <!-- 关联中央处理器 -->
        <servlet-class>org.springframework.web.servlet.DispatcherServlet</servlet-class>
        <!-- 读取springmvc的配置文件 -->
        <init-param>
            <param-name>contextConfigLocation</param-name>
            <param-value>classpath:applicationContext.xml</param-value>
        </init-param>
    </servlet>
    <servlet-mapping>
        <servlet-name>springmvc</servlet-name>
        <url-pattern>*.do</url-pattern>
    </servlet-mapping>

</web-app>
- 配置处理器映射器:使用
BeanNameUrlHandlerMapping类型 - 配置处理器适配器:使用
SimpleControllerHandlerAdapter类型 - 配置视图解析器:使用
InternalResourceViewResolver类型
<?xml version="1.0" encoding="UTF-8"?>
<beans xmlns="http://www.springframework.org/schema/beans"
       xmlns:mvc="http://www.springframework.org/schema/mvc"
       xmlns:xsi="http://www.w3.org/2001/XMLSchema-instance"
       xsi:schemaLocation="
        http://www.springframework.org/schema/beans
        https://www.springframework.org/schema/beans/spring-beans.xsd
        http://www.springframework.org/schema/mvc
        https://www.springframework.org/schema/mvc/spring-mvc.xsd">

    <!-- 配置处理器映射器 -->
    <bean class="org.springframework.web.servlet.handler.BeanNameUrlHandlerMapping"></bean>
    <!-- 配置处理器适配器 -->
    <bean class="org.springframework.web.servlet.mvc.SimpleControllerHandlerAdapter"></bean>
    <!-- 配置视图解析器 -->
    <bean class="org.springframework.web.servlet.view.InternalResourceViewResolver"></bean>

</beans>
- 实现表现层:实现
Controller接口
import org.springframework.web.servlet.ModelAndView;
import org.springframework.web.servlet.mvc.Controller;

import javax.servlet.http.HttpServletRequest;
import javax.servlet.http.HttpServletResponse;

/**
 * 控制层
 */
public class HelloAction implements Controller {
    @Override
    public ModelAndView handleRequest(HttpServletRequest httpServletRequest, HttpServletResponse httpServletResponse) throws Exception {
        ModelAndView mv = new ModelAndView();
        //可以返回视图+数据
        mv.addObject("hello","SpringMVC world!");
        //返回跳转的地址
        mv.setViewName("index.jsp");
        return mv;
    }
}
- 配置action:在applicationContext配置文件中
<!-- 配置action -->
<bean name="/hello.do" class="com.xm.action.HelloAction"></bean>
第二种方式(通过id找到Controller):
- 配置前端控制器:跟第一种配置方式一样
- 配置处理器映射器:使用
SimpleUrlHandlerMapping类型 - 配置处理器适配器:使用
HttpRequestHandlerAdapter - 配置视图解析器:跟第一种方式一样
<?xml version="1.0" encoding="UTF-8"?>
<beans xmlns="http://www.springframework.org/schema/beans"
       xmlns:mvc="http://www.springframework.org/schema/mvc"
       xmlns:xsi="http://www.w3.org/2001/XMLSchema-instance"
       xsi:schemaLocation="
        http://www.springframework.org/schema/beans
        https://www.springframework.org/schema/beans/spring-beans.xsd
        http://www.springframework.org/schema/mvc
        https://www.springframework.org/schema/mvc/spring-mvc.xsd">

    <!-- 配置处理器映射器 -->
    <bean class="org.springframework.web.servlet.handler.SimpleUrlHandlerMapping"/>
    <!-- 配置处理器适配器 -->
    <bean class="org.springframework.web.servlet.mvc.HttpRequestHandlerAdapter"/>
    <!-- 配置视图解析器 -->
    <bean class="org.springframework.web.servlet.view.InternalResourceViewResolver"/>

</beans>
- 开发表现层的action(实现
HttpRequestHandler接口)
import org.springframework.web.HttpRequestHandler;

import javax.servlet.ServletException;
import javax.servlet.http.HttpServletRequest;
import javax.servlet.http.HttpServletResponse;
import java.io.IOException;

public class ActionByHttpRequestHandlerAction implements HttpRequestHandler {
    @Override
    public void handleRequest(HttpServletRequest httpServletRequest, HttpServletResponse httpServletResponse) throws ServletException, IOException {
        //设置值
        httpServletRequest.setAttribute("name","第二种配置方式");
        //跳转页面到指定页面
        httpServletRequest.getRequestDispatcher("httpRequestHandler.jsp").forward(httpServletRequest,httpServletResponse);
    }
}
- 配置action:使处理器映射器关联具体的id
<!-- 配置处理器映射器 -->
<bean class="org.springframework.web.servlet.handler.SimpleUrlHandlerMapping">
    <!-- 关联具体的id -->
    <property name="mappings">
        <props>
            <prop key="/action.do">secondAction</prop>
        </props>
    </property>
</bean>
<!-- 配置处理器适配器 -->
<bean class="org.springframework.web.servlet.mvc.HttpRequestHandlerAdapter"/>
<!-- 配置视图解析器 -->
<bean class="org.springframework.web.servlet.view.InternalResourceViewResolver"/>

<!-- 配置Action -->
<bean id="secondAction" class="com.xm.action.ActionByHttpRequestHandlerAction"></bean>
第三种方式(注解)
- 配置前端控制器(同前面)
- 配置注解的映射器和适配器,有两种方式
- 分别配置
RequestMappingHandlerMapping和RequestMappingHandlerAdapter
<!-- 注解映射器 -->
<bean class="org.springframework.web.servlet.mvc.method.annotation.RequestMappingHandlerMapping"></bean>
<!-- 注解适配器 -->
<bean class="org.springframework.web.servlet.mvc.method.annotation.RequestMappingHandlerAdapter"></bean>
- 直接使用注解驱动
<mvc:annotation-driven></mvc:annotation-driven>
- 配置视图解析器(同前两种方式)
- 开发action,使用注解方式不需要实现接口
注解可以加在类上,表示根路径,加在方法上表示具体的路径
可以通过指定请求方式:
(value=”/test”,method=RequestMethod.POST/GET/..) 此时不能省略value,如果没指定method默认接受任意方式(请求方式不正确会报405错误)
请求表达式
用于通过表达式精确映射请求
(value="/testparam",params={"username","age!=10"},headers={"Accept-Language=zh-CN,zh;q=0.8"})表示参数必须含有username和age,并且age不能等于10,同时请求头内的内容必须符合固定值
import org.springframework.stereotype.Controller;
import org.springframework.web.bind.annotation.RequestMapping;
import org.springframework.web.servlet.ModelAndView;

import javax.servlet.http.HttpServletRequest;
import javax.servlet.http.HttpServletResponse;

@Controller
("/prefix")
public class AnnotationsAction {

    //方法自定义
    //设置请求路径
    ("/annotation.do")
    public ModelAndView testAction(HttpServletRequest request, HttpServletResponse response){
        ModelAndView mv = new ModelAndView();
        mv.addObject("name","注解配置方法");
        mv.setViewName("/annotation.jsp");
        return mv;
    }
}
- 配置注解扫描:使容器创建对象
<context:component-scan base-package="com.xm.action"></context:component-scan>
功能之间业务跳转
有两种方式实现
- 方式一:通过ModelAndView返回其他业务的内容
("/to-annotation1.do")
public ModelAndView pageJump1(HttpServletRequest request){
    ModelAndView mv = new ModelAndView();
    mv.setViewName("/prefix/annotation.do");//如果有定义根路径,需要加上根路径
    return mv;
}
- 方式二:通过字符串直接返回
("/to-annotation2.do")
public String pageJump2(HttpServletRequest request){
    return "/prefix/annotation.do";
}
不同功能之间的传值
功能方法之间(C-C)
- Request
- Session
- Cache(分布式缓存)
("/addCar.do")
public String addCar(HttpServletRequest request){
    request.setAttribute("tag","电动汽车");
    return "/listCar.do";
}

("/listCar.do")
public ModelAndView listCar(HttpServletRequest request){
    //ModelAndView可以传值、跳转页面
    ModelAndView mv = new ModelAndView();
    Object tag = request.getAttribute("tag");
    mv.addObject("tag",tag);
    mv.setViewName("/car.jsp");
    return mv;
}
从具体的功能方法到页面(C-V)
ModelAndView
setViewName设置跳转地址,addObject传数据
Map方式
public String addCar2(Integer carnum, String carname, Map<String,String>){
    System.out.println(carname);
    System.out.println(carnum);
    map.put("tag",username);//会自动将数据传递到页面
    return "car.jsp";
}
- Model方式
model带数据,return返回地址
("/addCar2.do")
public String addCar2(Integer carnum, String carname, Model model){
    System.out.println(carname);
    System.out.println(carnum);
    model.addAttribute("tag",carname);
    return "car.jsp";
}
从页面到到功能方法(V-C)
- request.getParameter
("/addCar.do")
public String addCar(HttpServletRequest request){
	  //在这里获取传过来的值
    String carname = request.getParameter("carname");
    System.out.println(carname);
    request.setAttribute("tag",carname);
    return "/listCar.do";
}
- 指定具体的类型接收具体的参数
<form action="/addCar2.do" method="post">
    汽车名称:<input type="text" name="carname"><br>
    购买数量:<input type="text" name="carnum"><br>
    <input type="submit">
</form>
("/addCar2.do")
public String addCar2(String carname,Integer carnum){
    System.out.println(carname);
    System.out.println(carnum);
    return "/listCar.do";
}
这种方式要求传的类型,名称与形参类型,名称一一对应,一旦类型不匹配,直接报错,找不到相应的跳转页面,不进行跳转
当参数是数组类型时:
<form action="/delCar.do" method="post">
    汽车编号:<input type="checkbox" name="cids" value="1"><br>
    汽车编号:<input type="checkbox" name="cids" value="2"><br>
    汽车编号:<input type="checkbox" name="cids" value="3"><br>
    汽车编号:<input type="checkbox" name="cids" value="4"><br>
    汽车编号:<input type="checkbox" name="cids" value="5"><br>
    <input type="submit">
</form>
("/delCar.do")
public String delCar(Integer[] cids){
    //获取数组的方式1:
    //String[] cids = request.getParameterValues("cid");
    //方式2:匹配参数(一般使用这种方式)
    for (Integer cid : cids) {
        System.out.println(cid);
    }
    return "/listCar.do";
}
- 设置默认值及可选参数
此时必须使用@RequestParam注解,并在其中使用defaultValue设置默认值,required设置参数是否可选
("/list")
public String list(
    @RequestParam(value="currentpage",defaultValue="1",required=false)Integer currentpage,
    @RequestParam(value="pagesize",defaultValue="10",required=false)Intrger pagesize)
){
    ....
}
- 使用封装类型bean来接收多个参数
/**
 * 使用该类来接收参数
 */
public class CarDTO {
    private String carname;
    private Integer carnum;
    private Integer[] cids;

    public String getCarname() {
        return carname;
    }

    public void setCarname(String carname) {
        this.carname = carname;
    }

    public Integer getCarnum() {
        return carnum;
    }

    public void setCarnum(Integer carnum) {
        this.carnum = carnum;
    }

    public Integer[] getCids() {
        return cids;
    }

    public void setCids(Integer[] cids) {
        this.cids = cids;
    }
}
<form action="/updateCar.do" method="post">
    汽车名称:<input type="text" name="carname"><br>
    购买数量:<input type="text" name="carnum"><br>
    汽车编号:<input type="checkbox" name="cids" value="1"><br>
    汽车编号:<input type="checkbox" name="cids" value="2"><br>
    汽车编号:<input type="checkbox" name="cids" value="3"><br>
    汽车编号:<input type="checkbox" name="cids" value="4"><br>
    汽车编号:<input type="checkbox" name="cids" value="5"><br>
    <input type="submit">
</form>
("/updateCar.do")
public String updateCar(CarDTO carDTO){
    System.out.println("汽车名称:"+carDTO.getCarname());
    System.out.println("汽车数量:"+carDTO.getCarnum());
    System.out.println("汽车编号:");
    Integer[] cids = carDTO.getCids();
    for (Integer cid : cids) {
        System.out.println(cid);
    }
    return "/listCar.do";
}
数据格式化
时间日期
注解方式
对于类型定义的时间,数字类型,如果在前端直接以字符串方式传输过来,拿到之后无法进行解析匹配,这时候可以通过格式化注解方式进行转换,或者直接就把属性定义成String类型
public class CarDTO {
    private String carname;
    private Integer carnum;
    private Integer[] cids;

    @DateTimeFormat(pattern = "yyyy-MM-dd")
    private Date create;//如果直接接收会失败,如果想直接接收,需要使用string类型

    @NumberFormat(pattern = "#,###,###.##")
    private Double price;
}
在页面上,如果希望输出格式化的数据,可以使用jsp的fmt(format)标签
<c:forEach items="${carList}" var="car">
    ${car.carname},
    ${car.carnum},
    <fmt:formatDate value="${car.create}" pattern="yyyy-MM-dd hh:mm:ss"/>
    <fmt:formatNumber value="${car.price}" pattern="#,###,###.##"/><br>
</c:forEach>
使用日期转换器
通过继承Converter接口,实现自定义日期格式
public class DateConverter implements Converter<String, Date> {
    @Override
    public Date convert(String s) {
        SimpleDateFormat sdf = new SimpleDateFormat("yyyy-MM-dd");
        try {
            sdf.setLenient(false);//是否宽松解析:默认为true
            return sdf.parse(s);
        } catch (ParseException e) {
            e.printStackTrace();
        }
        return null;
    }
}
在springMVC中配置类型转换器
<mvc:annotation-driven conversion-service="myConversion"/>
<!--类型转换器 -->
<bean id="myConversion" class="org.springframework.format.support.FormattingConversionServiceFactoryBean">
    <property name="converters">
        <set>
            <bean class="com.xm.converter.DateConverter"></bean>
        </set>
    </property>
</bean>
对象转换器
public class UserConverter implements Converter<String, User> {
    @Override
    public User convert(String s) {
        System.out.println(s);
        if(s != null){
            String[] split = s.split("-");
            System.out.println(split.length);
            if (split != null && split.length == 4){
                String username = split[0];
                String password = split[1];
                Integer age = Integer.parseInt(split[2]);
                String email = split[3];

                User user = new User();
                user.setUsername(username);
                user.setPassword(password);
                user.setAge(age);
                user.setEmaill(email);

                System.out.println(user);
                return user;
            }
        }
        return null;
    }
}
<!--类型转换器 -->
<bean id="myConversion" class="org.springframework.format.support.FormattingConversionServiceFactoryBean">
    <property name="converters">
        <set>
            <bean class="com.xm.converter.DateConverter"></bean>
            <bean class="com.xm.converter.UserConverter"></bean>
        </set>
    </property>
</bean>
嵌套绑定数据
针对内部类的属性:
public class CarDTO {
    private String carname;
    private Integer carnum;
    private Integer[] cids;
    //关联对象
    private CarTypeDTO cartype;
}

public class CarTypeDTO {

    private String cartype;

	  public String getCartype() {
        return cartype;
    }

    public void setCartype(String cartype) {
        this.cartype = cartype;
    }
在获取前端传过来的值时,jsp应该使用嵌套调用来获取:
汽车类型:<input type="text" name="cartype.cartype"/>
转发与重定向
页面之间的跳转默认使用的是转发
/**
* 转发
*/
("/addCar.do")
public String addCar(HttpServletRequest request){
    String carname = request.getParameter("carname");
    System.out.println(carname);
    request.setAttribute("tag",carname);
    return "forward:/listCar.do";
}

/**
* 重定向
*/
("/addCar.do")
public String addCar(HttpServletRequest request){
    String carname = request.getParameter("carname");
    System.out.println(carname);
    request.setAttribute("tag",carname);
    return "redirect:/listCar.do";
}
文件上传
- 导入
commons-fileupload.jar和commons-io.jar依赖 - 开发上传页面
<form action="/uploadImg.do" method="post" enctype="multipart/form-data">
    汽车图片:<input type="file" name="img"><br>
    <input type="submit">
</form>
- 配置文件类型解析器
<bean id="multipartResolver" class="org.springframework.web.multipart.commons.CommonsMultipartResolver">
    <!-- 设置最大文件大小(单位KB) -->
    <property name="maxUploadSize" value="1048576"></property>
</bean>
- 开发action
使用MultipartFile类对文件进行获取,添加@RequestParam注解,参数名要和前端传的name一致@RequestParam(“img”) MultipartFile multipartFile
package com.xm.action;

import org.springframework.stereotype.Controller;
import org.springframework.web.bind.annotation.RequestMapping;
import org.springframework.web.bind.annotation.RequestParam;
import org.springframework.web.multipart.MultipartFile;

import javax.servlet.http.HttpServletRequest;
import java.io.File;
import java.io.IOException;

@Controller
public class upLoadFile {

    ("/uploadImg.do")
    public String uploadImg(HttpServletRequest request, @RequestParam("img") MultipartFile multipartFile) throws IOException {
        //使用request接收普通类型参数
        String name = request.getParameter("name");
        System.out.println(name);
        //使用multipartFile接收文件类型的参数
        //得到的文件名
        String originalFilename = multipartFile.getOriginalFilename();
        //存储的目标地址
        File dest = new File("/Users/xiaoming/IdeaProjects/SpringmvcStudy/File/"+originalFilename);
        //将文件内容写入到指定的目标地方
        multipartFile.transferTo(dest);

        return "/listCar.do";
    }
}
多文件上传
使用CommonsMultipartFile注解获取前端传来的多个文件放在一个数组里
("/uploadImg2.do")
public String uploadImgs(HttpServletRequest request, @RequestParam("imgs")CommonsMultipartFile files[]) throws IOException {
    String name = request.getParameter("name");
    System.out.println(name);
    //使用CommonsMultipartFile注解获取多个文件封装为数组
    for (CommonsMultipartFile file : files) {
        String filename = file.getOriginalFilename();
        File dest = new File("/Users/xiaoming/IdeaProjects/SpringmvcStudy/File/"+filename);
        file.transferTo(dest);
    }
    return "/listCar.do";
}
JSON处理
- 导入json依赖包:
- jackson-core
- jackson-databind
- jackson-annotations
- 使用
ResponseBody注解标识接口,会使该接口返回的数据直接封装成json格式
/**
 * 响应json
 */
@ResponseBody
("/listJson.do")
public List<CarDTO> listJson(HttpServletRequest request){
    //封装数据
    List<CarDTO> list = new ArrayList<>();
    list.add(new CarDTO("car1",1,new Date(),2343.345345));
    list.add(new CarDTO("car2",2,new Date(),34.232));
    list.add(new CarDTO("car3",3,new Date(),235345.234));
    return list;
}
对于时间类型,json会使用long类型作为响应,推荐直接使用String或者long类型
嵌套json
/**
 * 响应json
 */
@ResponseBody
("/listJson2.do")
public Map<String,Object> listJson2(HttpServletRequest request){
    Map<String,Object> map = new HashMap<>();
    //封装数据
    List<CarDTO> list = new ArrayList<>();
    list.add(new CarDTO("car1",1,new Date(),2343.345345));
    list.add(new CarDTO("car2",2,new Date(),34.232));
    list.add(new CarDTO("car3",3,new Date(),235345.234));

    map.put("data", list);
    return map;
}
视图
物理视图
使用页面完整路径:
配置视图解析器并且在action中通过mv.setViewName("/hello.jsp")返回跳转的地址
逻辑视图
通过相对路径,可以把页面放入受到保护的目录WEB-INF中,页面不能直接访问到,必须通过action做跳转
- 视图解析器
<!-- 视图解析器 -->
<bean class="org.springframework.web.servlet.view.InternalResourceViewResolver">
    <!-- 逻辑视图 -->
    <!-- 前缀 -->
    <property name="prefix" value="/WEB-INF/"></property>
    <!-- 后缀 -->
    <property name="suffix" value=".jsp"></property>
</bean>
- action
@Controller
public class HelloAction{
    @RequestMapping("/myhello.do")
    public String myHello(HttpServletRequest request){
        //需要跳转的页面
        //return "/WEB-INF/[前缀]hello.jsp[后缀]
        return "hello";
    }
}
重定向传值
当使用页面重定向时,通常request会被刷新,其中原来的数据就不存在了,可以使用RedirectAttributesl类在重定向时将值传给目标页面的request
("/preAdd.do")
public String preAdd(RedirectAttributes attributes){
    attributes.addAttribute("tag","重定向传值");
    return "redirect:/myhello.do";
}
统一异常处理
方式一:(通常用于响应到页面)
- 开发自定义的异常类
package com.xm.exception;

public class CustomerException extends Exception {
    private String message;

    public CustomerException() {
    }

    public CustomerException(String message) {
        this.message = message;
    }

    @Override
    public String getMessage() {
        return message;
    }

    public void setMessage(String message) {
        this.message = message;
    }
}
- 开发统一异常处理器
package com.xm.exception;

import org.springframework.web.servlet.HandlerExceptionResolver;
import org.springframework.web.servlet.ModelAndView;

import javax.servlet.http.HttpServletRequest;
import javax.servlet.http.HttpServletResponse;

public class LogExceptionHandler implements HandlerExceptionResolver {
    @Override
    public ModelAndView resolveException(HttpServletRequest httpServletRequest, HttpServletResponse httpServletResponse, Object o, Exception e) {
        ModelAndView mv = new ModelAndView();
        CustomerException customerException = null;
        //获取系统的异常信息
        if(e instanceof CustomerException){
            customerException = (CustomerException) e;
        }else {
            customerException = new CustomerException("系统繁忙");
        }
        mv.addObject("msg",customerException.getMessage());
        //跳转到统一错误信息页面
        mv.setViewName("error");
        return mv;
    }
}
- 在配置文件中配置异常处理Handler
<!-- 配置异常处理 -->
<bean class="com.xm.exception.LogExceptionHandler"></bean>
error.jsp(异常抛出后显示的页面)
<%@ page contentType="text/html;charset=UTF-8" language="java" isELIgnored="false" %>

<html>
<head>
    <title>统一异常处理</title>
</head>
<body>
欢迎访问XXX系统,${msg},请稍后重试
</body>
</html>
- 开发Action
/**
 * 使用默认页面内容显示
 * @param request
 * @return
 */
("/error-test.do")
public String errorTest(HttpServletRequest request){
    int i = 1/0;
    System.out.println(i);
    return "hello";
}

/**
 * 自定义内容显示
 * @param request
 * @return
 * @throws CustomerException
 */
("/error-test2.do")
public String errorTest2(HttpServletRequest request) throws CustomerException {
    try {
        int i = 1/0;
        System.out.println(i);
    }catch (Exception e){
        e.printStackTrace();
        throw new CustomerException("不能除以0小老弟啊");
    }
    return "hello";
}
方式二:注解的方法(通常用于响应到JSON)
- 不用实现异常Handler接口
- 不用配置异常Handler实现类
- 开发基类,所有的Action作为子类继承
- 开发自定义异常
public class PayException extends Exception {
    private Integer code;
    private String message;

    public PayException(Integer code, String message) {
        this.code = code;
        this.message = message;
    }

    public Integer getCode() {
        return code;
    }

    public void setCode(Integer code) {
        this.code = code;
    }

    @Override
    public String getMessage() {
        return message;
    }

    public void setMessage(String message) {
        this.message = message;
    }
}
- 开发处理的基类
使用@ExceptionHandler注解,同时可以在注解中指定异常类只处理指定的异常@ExceptionHandler(‘NumberFormatException.class’)
public class BaseAction {

    @ResponseBody   //响应json格式
    @ExceptionHandler   //异常处理器
    public Map<String,Object> myexp(HttpServletRequest req, Exception e){
        Map<String,Object> map = new HashMap<>();
        if(e instanceof PayException){
            PayException payException = (PayException) e;
            map.put("code",payException.getCode());
            map.put("errot",payException.getMessage());
        }else{
            map.put("code",-1);
            map.put("error","系统繁忙");
        }
        return map;
    }
}
- 开发Action继承类
@Controller
public class PayAction extends BaseAction {

    @ResponseBody
    ("/pay.do")
    public Map<String,Object> pay(HttpServletRequest req) throws PayException {
        Map<String,Object> map = new HashMap<>();
        String money = req.getParameter("money");
        if(StringUtils.isEmpty(money)){
            throw new PayException(-2,"参数money输入有误");
        }
        try {
            int i = 1/0;
            System.out.println(i);
        }catch (Exception e){
            e.printStackTrace();
            throw new PayException(-1,"支付排队中。。。");
        }
        map.put("code",0);
        map.put("message","支付成功");
        return map;
    }
}
全局异常处理
在异常处理器类或开发的基类的前面加上@ControllerAdvice,同时需要配置注解扫描
RestFul支持
主要针对get请求
非RESTFul方式:
https://域名/xxxx?id=3&msg=user
RESTFul方式:(简化URL,可读性较差,需要后台识别key)
https://域名/xxxx/3/user
- 前端控制器拦截所有资源
<servlet>
    <servlet-name>springmvc</servlet-name>
    <!-- 关联中央处理器 -->
    <servlet-class>org.springframework.web.servlet.DispatcherServlet</servlet-class>
    <!-- 读取springmvc的配置文件 -->
    <init-param>
        <param-name>contextConfigLocation</param-name>
        <param-value>classpath:applicationContext.xml</param-value>
    </init-param>
</servlet>
<servlet-mapping>
    <servlet-name>springmvc</servlet-name>
    <!-- 拦截所有 -->
    <url-pattern>/</url-pattern>
</servlet-mapping>
拦截所有后,WEB-INF文件夹下不能够直接访问,静态资源也被拦截,需要释放
2. 配置静态资源释放(springMVC配置文件中)
<!-- 配置静态资源解析
    表示js及其子目录的所有文件 -->
<mvc:resources mapping="/js/**" location="/js/"></mvc:resources>
<mvc:resources mapping="/css/**" location="/css/"></mvc:resources>
<mvc:resources mapping="/img/**" location="/img/"></mvc:resources>
- action:需要在requestMapping中通过占位符设定参数名和顺序,同时使用
@PathVariable注解变量
@Controller
public class LogAction {

    //给映射的路径用占位符
    ("/addLog/{id}/{msg}")
    public String addLog(@PathVariable Integer id,@PathVariable String msg){
        //需要通过url get路径传递过来的动态参数
        //@PathVariable用于注解路径变量
        System.out.println(id);
        System.out.println(msg);
        return "index";
    }
}
如果使用了逻辑视图,在功能方法之间跳转,如果存在方法的路径与视图重名,会导致直接跳转到页面,此时应该加上forward或者redirect来实现功能的跳转
Resetful请求方式
restful提供了get,post,delete,put多种方法进行,但是浏览器表单默认只支持post和get,spring提供了过滤器HiddenHttpMethodFilter,可以将这些请求转化为标砖的http方法,支持四种方式的请求
过滤器配置:
<filter>
    <filter-name>HiddenHttpMethodFilter</filter-name>
    <filter-class>org.springframework.web.filter.HiddenHttpMethodFilter</filter-class>
</filter>
<filter-mapping>
    <filter-name>HiddenHttpMethodFilter</filter-name>
    <url-pattern>/*</url-pattern>
</filter-mapping>
from表单请求方式
<form action="delete/1" method="post">
    <input type="text" name="_method" value="DELETE"/>
    ...
</form>
拦截器
在action需要有前提条件的情况下使用,例如:需要先登录才能反问页面
- 第一步:开发拦截器
需要实现HandlerInterceptor接口
public class LogInterceptor implements HandlerInterceptor {

    /**
     * 在执行具体方法之前调用
     * @param request
     * @param response
     * @param handler
     * @return
     * @throws Exception
     */
    @Override
    public boolean preHandle(HttpServletRequest request, HttpServletResponse response, Object handler) throws Exception {

        //对不要检验的页面放行
        String requestURI = request.getRequestURI();
        if(requestURI.indexOf("login")>0){
            return true;
        }
        //得到session是否有内容
        HttpSession session = request.getSession();
        Object user = session.getAttribute("user");
        if(user!=null){
            return true;//如果登陆了,正常访问所有action
        }
        request.getRequestDispatcher("login.jsp").forward(request,response);
        return false;
    }


    /**
     * 在进入Handler方法之后,返回modelAndView之前执行
     * 如果想要向页面提供一些公共数据或者一些公用的配置信息,可以考虑使用这里的ModelAndView
     * @param request
     * @param response
     * @param handler
     * @param modelAndView
     * @throws Exception
     */
    @Override
    public void postHandle(HttpServletRequest request, HttpServletResponse response, Object handler, ModelAndView modelAndView) throws Exception {

    }

    /**
     * 执行完Handler之后执行
     * 日志、系统性能分析
     * @param request
     * @param response
     * @param handler
     * @param ex
     * @throws Exception
     */
    @Override
    public void afterCompletion(HttpServletRequest request, HttpServletResponse response, Object handler, Exception ex) throws Exception {

    }
}
- 配置拦截器
<!-- 配置拦截器 -->
<mvc:interceptors>
    <mvc:interceptor>
        <mvc:mapping path="/*"/><!-- 系统的所有请求 -->
        <mvc:exclude-mapping path="/lib/**"> <!-- 设置放行不拦截的路径 -->
        <bean class="com.xm.interceptor.LogInterceptor"></bean><!-- 登录拦截器 -->
    </mvc:interceptor>
</mvc:interceptors>
参数注解
- @CookieValue:用于或者cookie中的指定值
("/testcookie")
public String testCookie(@CookieValue("JESSIONID") String seesionId){
    System.out.println(sessionId);
    return "success";
}
- @RequestHeader:用于获取请求头的指定内容
("/testheader")
public String testCookie(@RequestHeader(value="Accept-Language") String header){
    System.out.println(header);
    return "success";
}
- @SessionAttribute:用于设置session存储数据,使用时将其注解在Action类上
@
SessionAttributes(value={"user"},types={String.class})表示当使用addAttribute方法加入user时,除了会在request中加入,还会在sessin中也加入user,types指定所有的String类型都加入session中